Create Custom Lists of Sold Listings, or Your Current Listings, on your WordPress Real Estate Website
“…the key indicator that matters to the one client looking for help with that one transaction is; “Can you close the deal?”, says Trulia writer Jovan Hackley
Give your websites more G.L.A.M.R. by increasing your Legitimacy and proving that you Can Close The Deal. You can do this by having a method to Display Sold Listings on your Real Estate Website.
100% of the Real Estate Websites we build are on WordPress.
90% of the Real Estate Websites we build are using IDX Broker Platinum.
90% of the Real Estate Websites we build are using an Agent Evolution Theme.
This instructional blog post assumes that your Real Estate Website is:
- Built using WordPress
- Built on the Genesis or Equity Framework
- Powered by IDX Broker Platinum IDX
>> If you need additional information about your WordPress Website you can view our complete: Website Instructional Video Series
How To Display Your Sold Listings
This can only be done by manually entering your listings. You can use the Sold/Pending feature of IDX Broker… However, we recommend that you use the WP Listings Plugin.
Since both methods require your valuable time we think you will get maximum results using the WP Listings Plugin.
This is because your Sold Listings will be stored on your self hosted WordPress in an archive that will give your Local SEO some much needed Google Juice. They will act like blog posts, or new content, and help build your Search Rankings.
Login to your WordPress Real Estate Website
>> https://www.YourWebsiteDomain/wp-admin
Enter your Username and Password
Step 1 >> Download the WP Listings Plugin
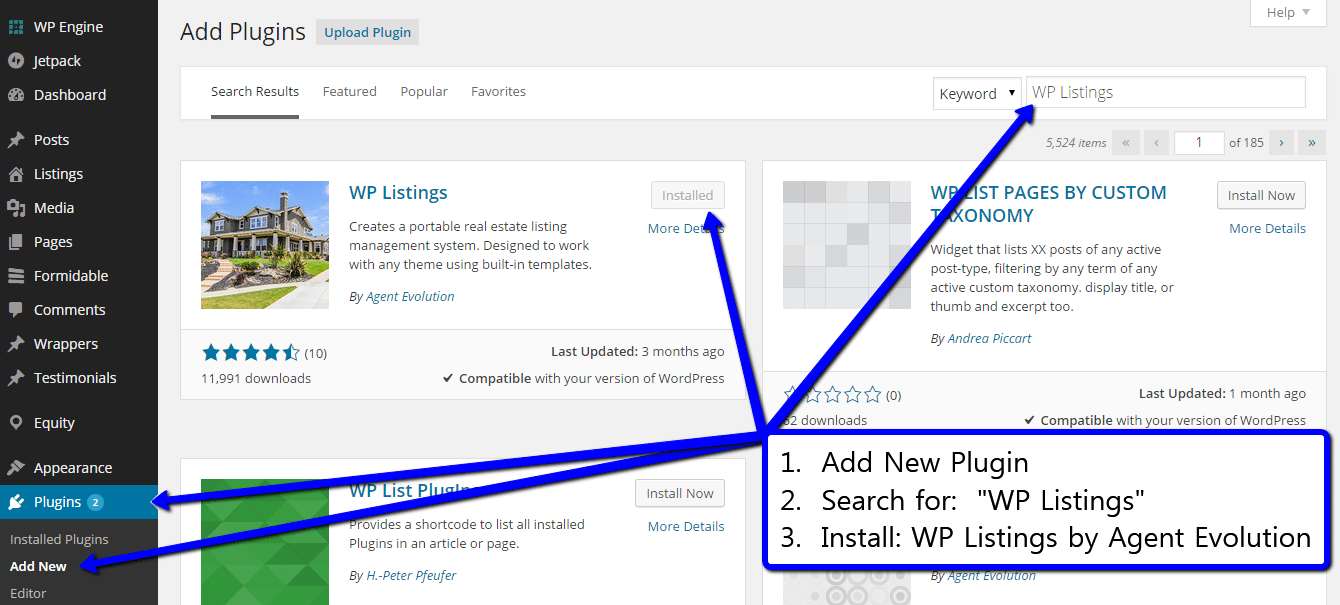
- Click on “Plugins” and then “Add New”
- Enter the keywords “WP Listings” into the search bar
- When you see “WP Listings” by Agent Evolution Click “Install Now”
>> You will be taken to a Plugin Activation Screen
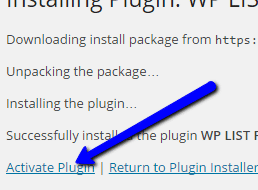
- Click “Activate Plugin”
Step 2 >> Set Up The WP Listings Plugin
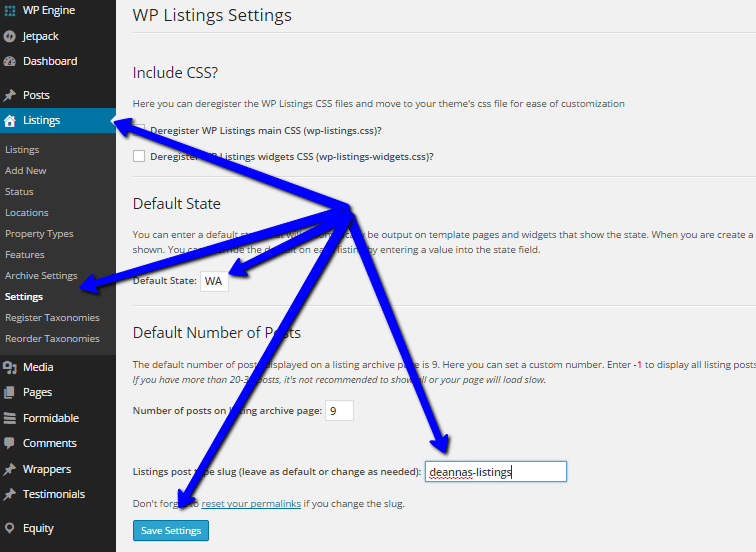
- Click on “Listings” then click on “Settings”
- Enter your “Default State”
- You can change the default slug “listings”
- If you change the default slug be sure to click on the “reset your permalink” link and simply click Save.
- This will reset your permalinks.
- Save Settings
Step 3 >> Customize The Archive Page
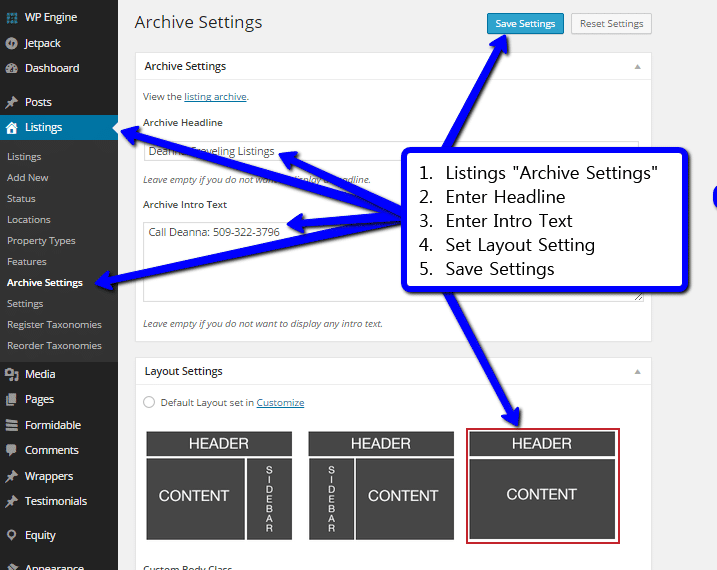
- Click “Listings” then click on “Archive Settings”
- Give your listings a Title
- Enter Some Optional Intro Text
- Set your Layout Settings
- Save Settings
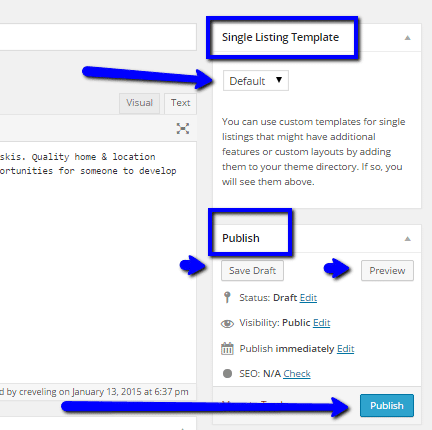
Step 4 >> Add New Sold Listing
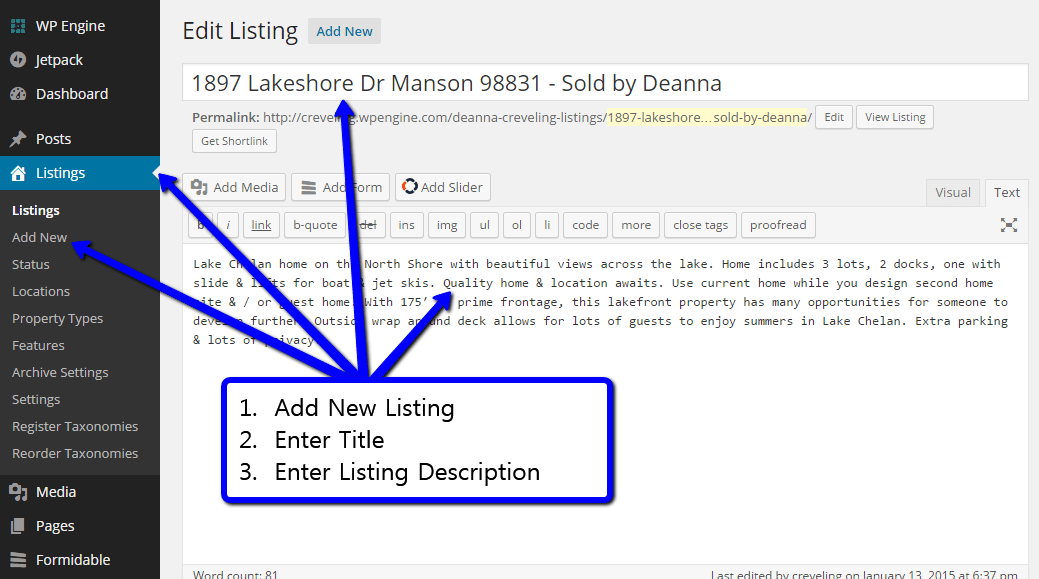
- Click on “Listings” then click on “Add New”
- Enter the Title for your listing
- We recommend you use the full address
- Be sure to at least include the city the listing was sold
- Enter the Listing Description

- Add any Listing Details you would like included
- Add any text you would like added as a Ribbon over the image that displays on the WP Listings Widget

- You can create a Photo Gallery
- Click on the “Add Media” button and add 1-3 images
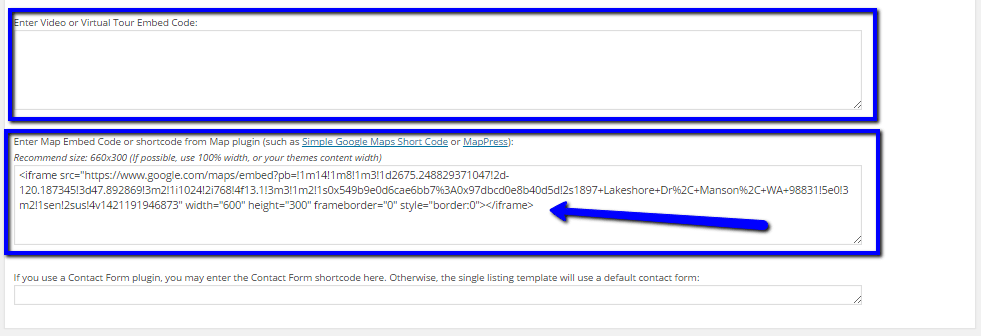
- You can add the embed code for:
- A Virtual Tour; Youtube, Vimeo, etc.
- Google Maps
>> To add A Google Map
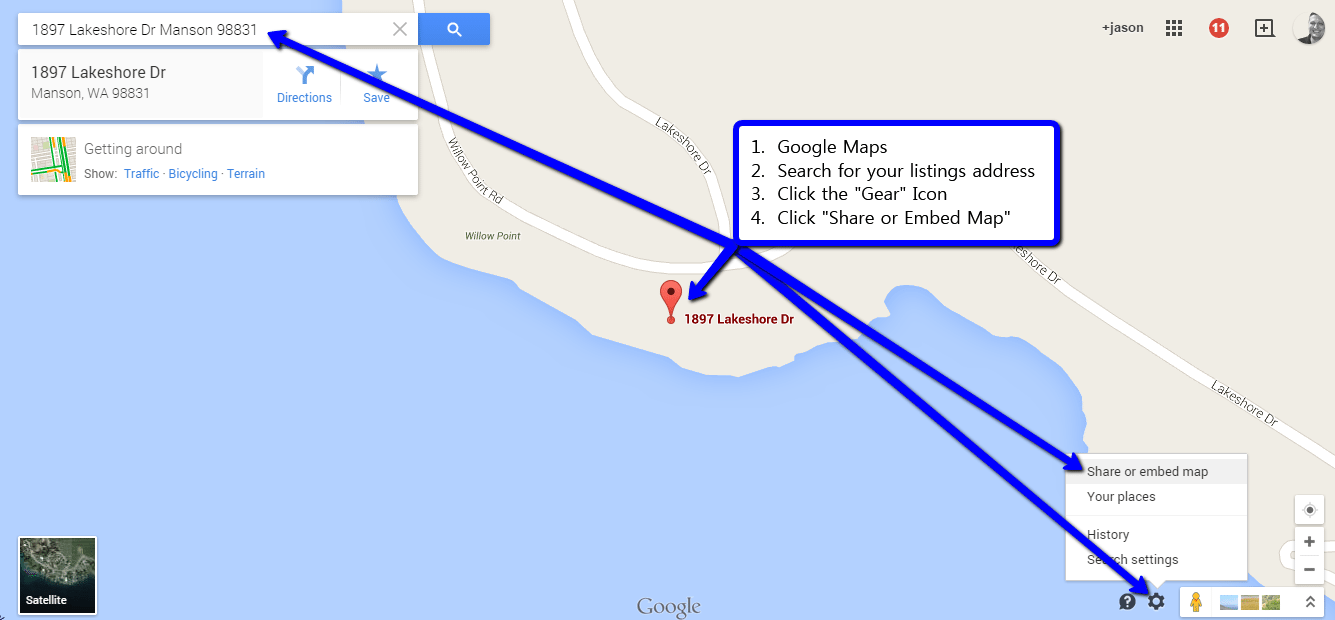
- Visit Google Maps: https://maps.google.com
- Enter the Address of the listing in the search bar
- Search and you will see the listing as Red Pin on the Map
- Click the Gear Icon
- Click on the “Share or Embed Map” link
- Click on the “Embed Map” Link
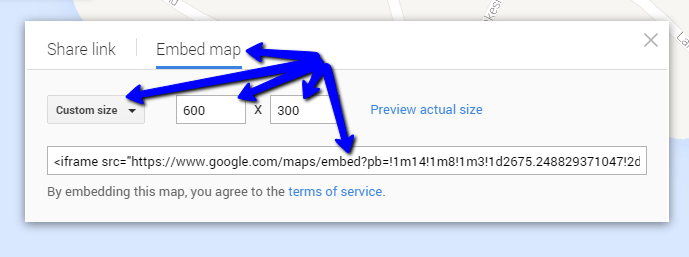
- Click on “Custom Size”
- Enter 600 x 300
- Copy the Embed Code: <iframe src=”….>
- Go back to your WordPress Website and Paste the embed code
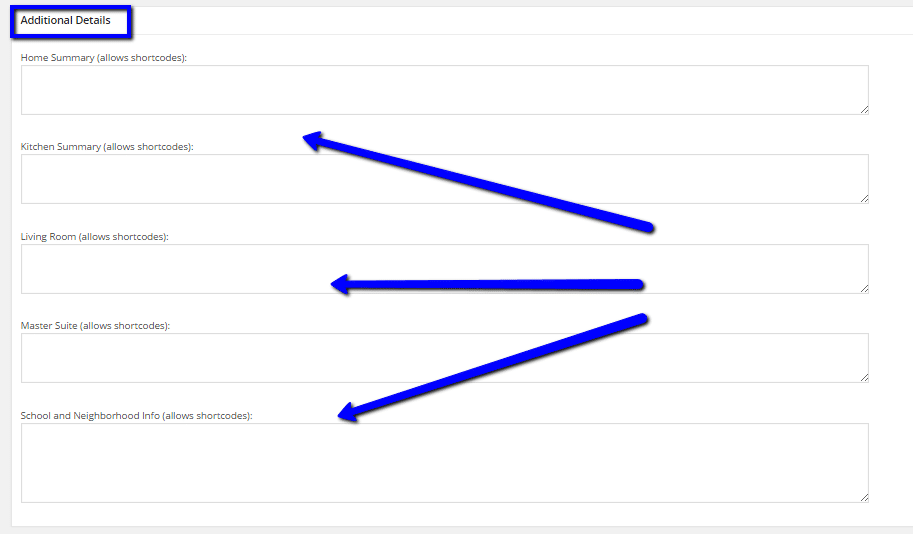
- Add Any Additional Details you would like displayed
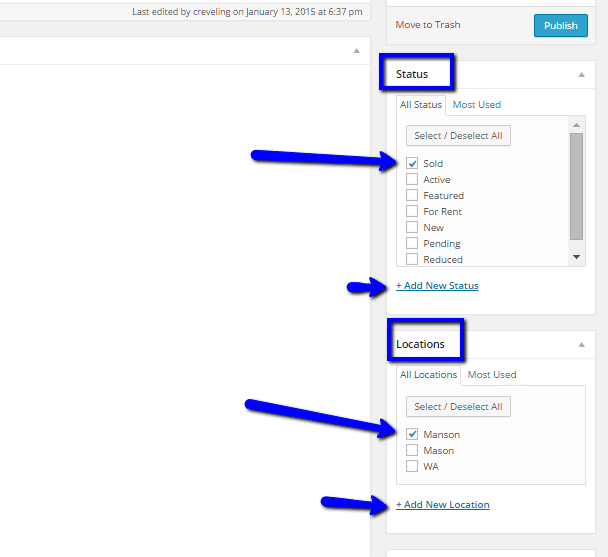
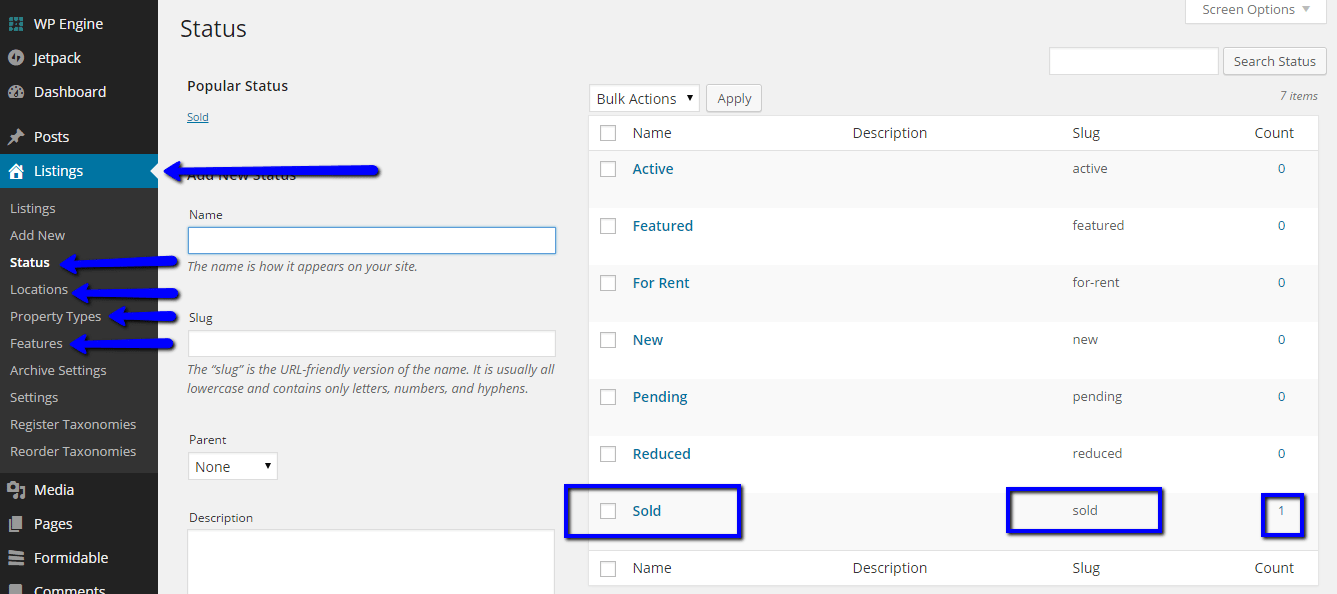
- Select the “Status” of the Listing
- You can add a new Status Category if you like
- Select the “Location” of the Listing
- You can add a new Status Category if you like
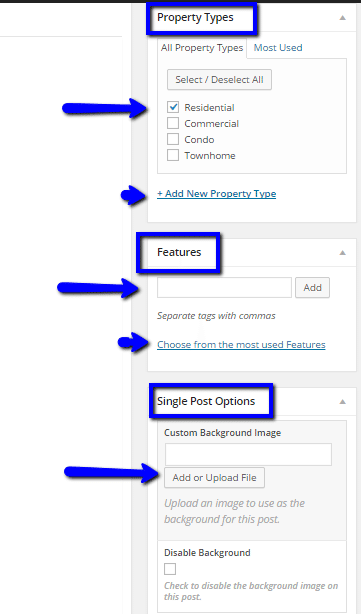
- Select any “Features” of the Listing
- You can add a new Status Category if you like
- You can add a “Custom Background Image” for your listing page
- You can Purchase custom WP Listings Templates from Agent Evolution if you would like a more customized look.
- Once you have entered all the Listing Data you can “Preview” the listing to see how it will appear on your Website.
- Once you are satisfied with the look of the Listing click “Publish”
Step 5 >> How to Display Sold Listings
- You Can Display Your Listings as a Page Category
- You Can Display Your Listings as a Widget
>> 1. Displaying Your Sold Listings as a Page Category
- You can display a list of your listings by Category
- Status
- Locations
- Property Types
- Features
- Click on “Listings” then click on the Category that you would like to view
- In the above example; We clicked on “STATUS”
- Click on the Sub Category “Sold” this is the link that displays only Sold Listings
>> OR You can add the list directly to your Navigation Bar:
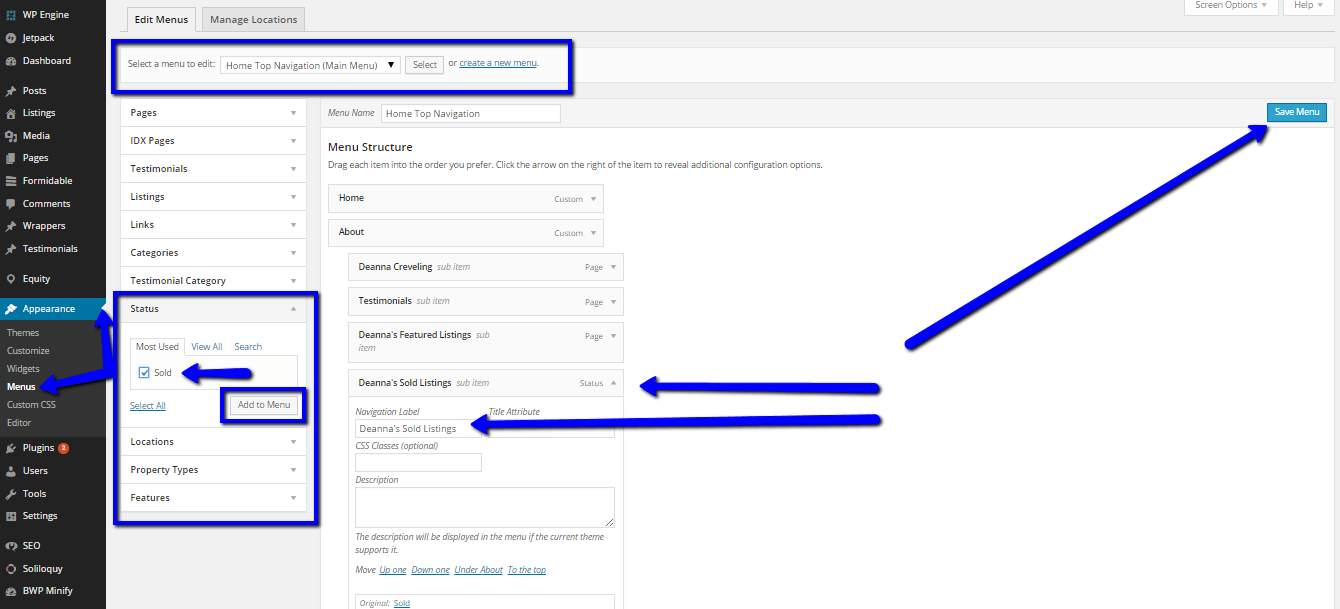
- Click on “Appearance” then click on “Menus”
- Make sure you have the correct menu, or Navigation Bar, selected
- Click on the Arrow icon next to “Status”
- Check the box of the Status you would like displayed; “Sold”
- That will add a Draggable box to your “Menu Structure”
- Move the box, or Menu Link, where you would like it
- Give it a “Navigation Label”
- Remember that this is what will be displayed as a link on your Websites Menu bar… so don’t make it to long.
- Save Menu
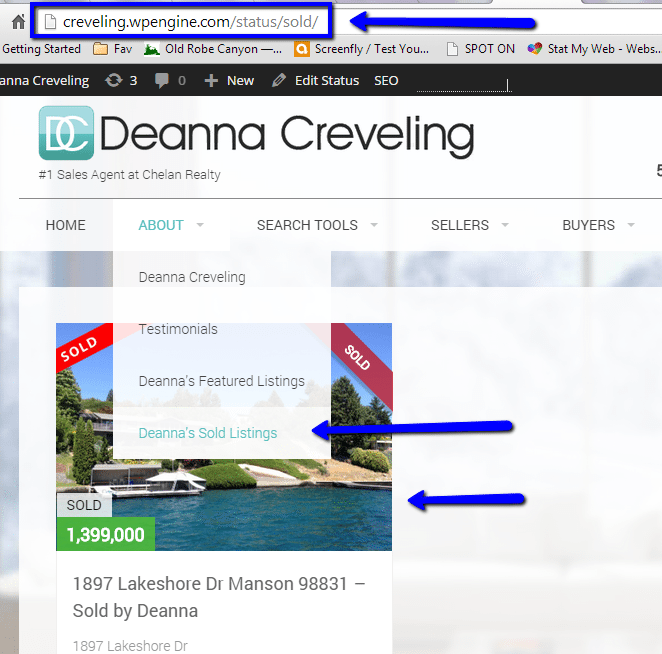
- This is how your Newly Created Sold Listings Menu Link will display
>> 2 Displaying Your Sold Listings as a Widget
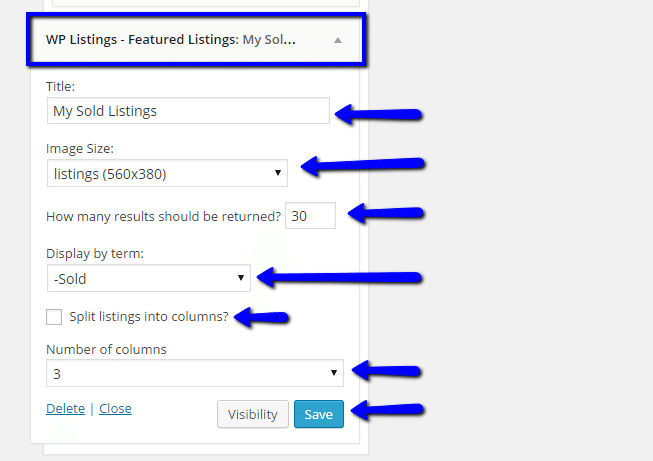
- Drag the “WP Listings” “Featured Listings” Widget to the widget location you would like your sold listings displayed
- Enter a Title
- Select the Image Size
- Enter how many listings you would like displayed
- Select the Category of Listings you would like displayed; “Sold”
- If you would like to display a column of listings check the “Split Listings into Columns?” box
- Then select how many columns you would like displayed
- Default is 1 column
- Click Save
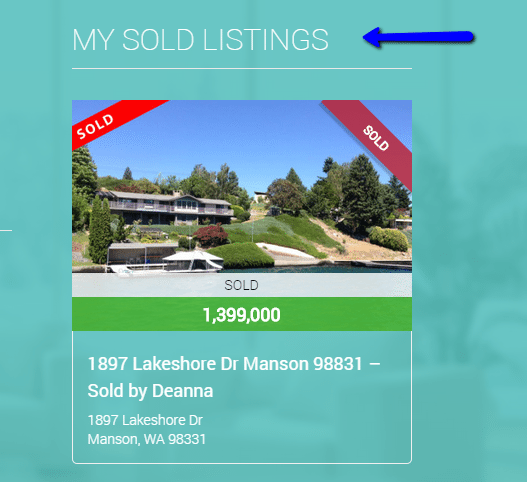
- This is an example of how the widget displays on the front end of your Real Estate Website
IDX Broker
If you would like to create your list of Sold Listings using your IDX Broker Account:
Please note: IDX Broker begins archiving listing data as of the first day that the MLS approves your account. This page will not contain any listings that were sold or taken off the market prior to that date. Archived listings will display here for 45 days. It is recommended that you log in every 4 to 6 weeks to update statuses on any listings you wish to keep a record of.
To view archived listings, go to Listings –> Sold & Pending Listings:
This page allows you to assign “Sold” or “Pending” status to various archived properties. Because we do not receive sold and pending listing data, we will not know the actual status of the listing (sold or pending vs. canceled, withdrawn, expired, or other statuses). You will want to designate these statuses in your control panel.
To edit the listing, click on the little pencil (edit) icon to the left of the listing. This will take you to the following screen to edit the property status:
These listings will now appear on your Sold/Pending Gallery link under Account Management > Page Links:
In the “Listing Pages” section under the Sold/Pending Gallery subheader:


Way сool! Some extremely valid points! I appreciate you
penning this article and also tһe res of thee ԝebbsіte is really ɡoⲟd.
Thank you.
you are in point of fact a excellent webmaster. The web site loading velocity is amazing.
It seems that you’re doing any unique trick. In addition, The contents are masterwork.
you’ve done a excellent job in this topic!