
Create As Many Sexy Single Property Websites As You Want
Using a Free IMPress Listings WordPress Plugin and a Pack of Themes You Can Get Free By Signing Up As A Member
“The 3 P’s of Selling a Home; PRICE, PRESENTATION and PROMOTION” ~ Unknown
I can not help you with Price or Presentation but I can help you to become a better promoter.
Have you heard the phrase; “Single Property Website”? These have been around for a while and my old company had a product called the “Listing Makeover” that made some pretty awesome Single Property Websites.
You have probably used:
- Postlets
- ePropertySites
- Tour Factory
- Real Bird
- Listing To Leads
Or some other service or company out there to create your Single Property Websites.
Single Property websites are an easy and cost-effective way to create an individualized website (or webpage) for 1 listing. A way for you to market your listing, besides just putting it on the MLS, and most importantly to impress your sellers. It gives the listing a stronger web presence and makes it easy to share the listing via Social Media and Syndication.
While giving the listing its own space on the internet may not sell the home any faster (although sometimes it does) it will certainly make you look like a Real Estate Marketing Whizz. And that can help you get more listings.
I am going to show you how to create Sexy Single Property Websites with a WordPress website, a free IMPress Listings plugin and a pack of themes you can download free if you become a Real Estate Marketing Member.
IMPress Listings
Agent Evolution has a cool little plugin that has been around for a few years called IMPress Listings, it used to be called WP Listings. What it does is allow you to manually add listings to any WordPress websites in stylish, simple, and organized way.
It allows you to add listings much like you do on your MLS, but it is even better because you can upload even more details and images.
In addition to giving you a template to create Archived listings on your WordPress website the plugin also has 2 neat widgets.
- Featured Listings — This allows you to beautifully display your listings as a row of listings on your website
- Listing Search — This gives you a search bar to search for the listings you have created using the plugin
I have referenced this plugin in the past most recently as the preferred tool for creating and archiving your “Sold Listings”.
Listing Templates
More recently Agent Evolution released Listing Templates that work with the IMPress Listings plugin to make the listing pages look like single property websites.
Meaning, instead of looking like the rest of your WordPress website each of your manually entered listings can have a customized theme, or look and feel.
There are now 5 Listing Templates Available:
- Spacious
- Classical
- Luxurious
- Elegant
- Solid
You can download the themes by joining as a free Real Estate Marketing Member.
Or if you are a client of ours we can load them for you.
Or if you are using the Equity Theme they come pre-loaded for you.
Creating A Single Property Website
You will need to have a WordPress website, and have the IMPress Listings Plugin loaded and activated. You will need to download the Themes if you are not using Equity.
Loading the Listing Themes
This is actually a bit trickier than you would hope for, but once it is done you don’t have to worry about it again.
1. Unzip or extract the theme out of each .zip folder
2. Using FTP, SFTP, or your CPanel you will need to load the 5 .php files into your Themes folder
All Hosting Providers Will Have Information On How To Access Your FTP or SFTP
- I use a program called Filezilla and SFTP to access the file directory of my WordPress websites
- You will need your FTP or SFTP Host (Something like: sftp://182.33.164 )
- You will need your Username (Possibly the same as your WordPress username)
- You will need your SFTP or FTP password
- You will need to know your port
3. Once logged in to your WordPress file directory you will need to find your Themes Folder
Your File Directory should look something like this on the right hand side of your Filezilla application:
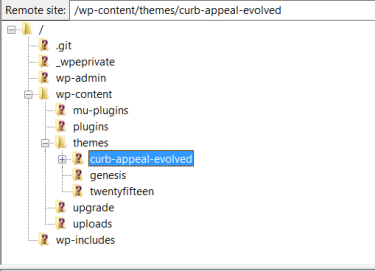
- Find the wp-content folder and click on it
- Find the themes folder and click on it
- Find your active theme and click on it
- On the left hand side of your Filezilla application is the Directory for your computer and should like something like this:
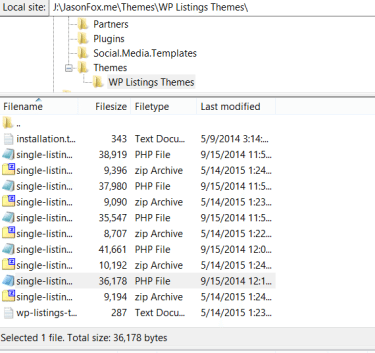
- Find the folder that you extracted the Listing Themes into
- Simply double-click each of the 5 themes and Filezilla will load them into your Themes folder
- They are the files that end it .php
That’s it the Listing Templates are now loaded into your WordPress Website
Adding The Listing
This is the easy part. Once the IMPress Listings plugin is loaded and activated. And the themes are loaded into your WordPress Theme folder you can start adding your listings.
- Click on the “Listings” Category in your WordPress Dashboard
- Click on “Create New”
- You will be directed to what looks like an average Post or Page screen:
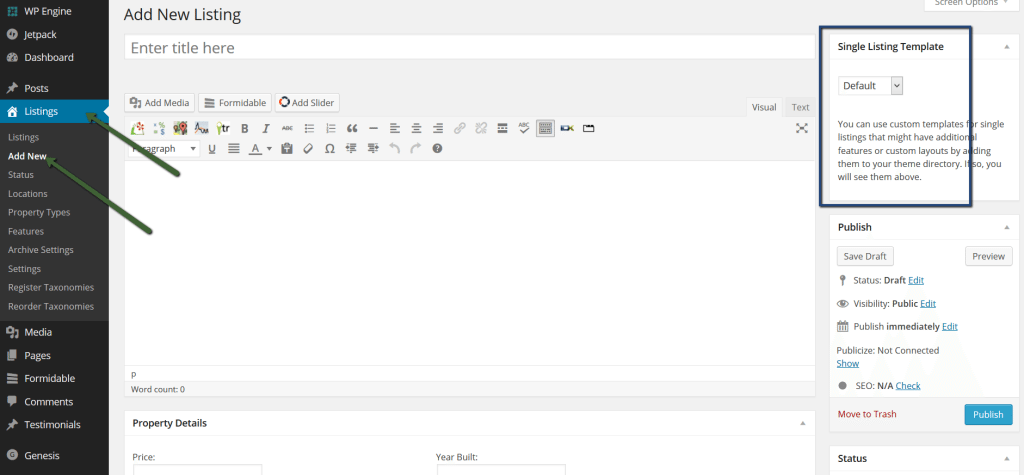
But you will notice a difference right away, the “Single Listing Template” selector.
- Give Your Listing a Title: The Address, or a consistent description of the listing with the city and state
- Scroll Down and Start filling in the “Property Details”
- When You Get to “Photo Gallery” be sure to add images in the form of a “Gallery”
- If you have a Tour Video or Virtual Tour embed code you drop it into the Video Box
- You can get Map embed code by entering your listing address into Google and Clicking on the Map
- Find the “Gear” icon at the bottom right of the full size Google Map Screen and click on it
- Click on Embed or Share, click on Embed Map
- Click on the Size and choose custom size: Enter 660 and 300
- Copy the embed code and paste it into the Map Box
- Add Additional Details
- Select the Property Type, Location, and Status
- Click “Save Draft”
You have created the IMPress Listing.
Now we want to make it a Single Property Website.
Go to the Single Listing Template Selector and Select each the 5 Listing Templates and click the “Preview” button to see how it looks.
Classical
Elegant

Luxurious

Solid

Spacious
Choose the template that you like best and “Publish” your very own Single Property Website.
What Do You Do With Your New Listing?
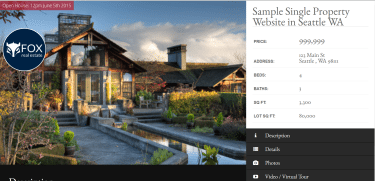
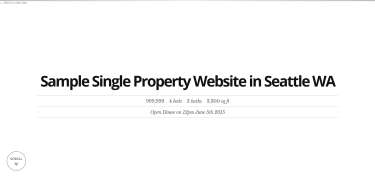
First thing I would do is copy the url of the new website you just created and share it with my clients. It should be something like this:
https://www.foxreal.estate/listings/sample-single-property-website-in-seattle-wa
You can go to Godaddy or Network Solutions or wherever and buy a domain and point it to the url you just created if you would like it to have its own unique domain name.
I would share the link on my Facebook Page, Pinterest, Twitter, Google+, and any other Social Media sites you think might help.
Most importantly, in my opinion, is that by following those steps I can now start an archive of Single Property Websites.
https://www.foxreal.estate/listings/
And that page is what I can show my future clients to show them, what a great marketing expert I am and the homes I have listed and sold.
In addition that page and the listings will be increasing your SEO or Search Engine Rankings, for long-tailed local real estate searches.
post contents
Using a Free IMPress Listings WordPress Plugin and a Pack of Themes You Can Get Free By Signing Up As A Member
“The 3 P’s of Selling a Home; PRICE, PRESENTATION and PROMOTION” ~ Unknown
I can not help you with Price or Presentation but I can help you to become a better promoter.
Have you heard the phrase; “Single Property Website”? These have been around for a while and my old company had a product called the “Listing Makeover” that made some pretty awesome Single Property Websites.
You have probably used:
- Postlets
- ePropertySites
- Tour Factory
- Real Bird
- Listing To Leads
Or some other service or company out there to create your Single Property Websites.
Single Property websites are an easy and cost-effective way to create an individualized website (or webpage) for 1 listing. A way for you to market your listing, besides just putting it on the MLS, and most importantly to impress your sellers. It gives the listing a stronger web presence and makes it easy to share the listing via Social Media and Syndication.
While giving the listing its own space on the internet may not sell the home any faster (although sometimes it does) it will certainly make you look like a Real Estate Marketing Whizz. And that can help you get more listings.
I am going to show you how to create Sexy Single Property Websites with a WordPress website, a free IMPress Listings plugin and a pack of themes you can download free if you become a Real Estate Marketing Member.
IMPress Listings
Agent Evolution has a cool little plugin that has been around for a few years called IMPress Listings, it used to be called WP Listings. What it does is allow you to manually add listings to any WordPress websites in stylish, simple, and organized way.
It allows you to add listings much like you do on your MLS, but it is even better because you can upload even more details and images.
In addition to giving you a template to create Archived listings on your WordPress website the plugin also has 2 neat widgets.
- Featured Listings — This allows you to beautifully display your listings as a row of listings on your website
- Listing Search — This gives you a search bar to search for the listings you have created using the plugin
I have referenced this plugin in the past most recently as the preferred tool for creating and archiving your “Sold Listings”.
Listing Templates
More recently Agent Evolution released Listing Templates that work with the IMPress Listings plugin to make the listing pages look like single property websites.
Meaning, instead of looking like the rest of your WordPress website each of your manually entered listings can have a customized theme, or look and feel.
There are now 5 Listing Templates Available:
- Spacious
- Classical
- Luxurious
- Elegant
- Solid
You can download the themes by joining as a free Real Estate Marketing Member.
Or if you are a client of ours we can load them for you.
Or if you are using the Equity Theme they come pre-loaded for you.
Creating A Single Property Website
You will need to have a WordPress website, and have the IMPress Listings Plugin loaded and activated. You will need to download the Themes if you are not using Equity.
Loading the Listing Themes
This is actually a bit trickier than you would hope for, but once it is done you don’t have to worry about it again.
1. Unzip or extract the theme out of each .zip folder
2. Using FTP, SFTP, or your CPanel you will need to load the 5 .php files into your Themes folder
All Hosting Providers Will Have Information On How To Access Your FTP or SFTP
- I use a program called Filezilla and SFTP to access the file directory of my WordPress websites
- You will need your FTP or SFTP Host (Something like: sftp://182.33.164 )
- You will need your Username (Possibly the same as your WordPress username)
- You will need your SFTP or FTP password
- You will need to know your port
3. Once logged in to your WordPress file directory you will need to find your Themes Folder
Your File Directory should look something like this on the right hand side of your Filezilla application:
- Find the wp-content folder and click on it
- Find the themes folder and click on it
- Find your active theme and click on it
- On the left hand side of your Filezilla application is the Directory for your computer and should like something like this:
- Find the folder that you extracted the Listing Themes into
- Simply double-click each of the 5 themes and Filezilla will load them into your Themes folder
- They are the files that end it .php
That’s it the Listing Templates are now loaded into your WordPress Website
Adding The Listing
This is the easy part. Once the IMPress Listings plugin is loaded and activated. And the themes are loaded into your WordPress Theme folder you can start adding your listings.
- Click on the “Listings” Category in your WordPress Dashboard
- Click on “Create New”
- You will be directed to what looks like an average Post or Page screen:
But you will notice a difference right away, the “Single Listing Template” selector.
- Give Your Listing a Title: The Address, or a consistent description of the listing with the city and state
- Scroll Down and Start filling in the “Property Details”
- When You Get to “Photo Gallery” be sure to add images in the form of a “Gallery”
- If you have a Tour Video or Virtual Tour embed code you drop it into the Video Box
- You can get Map embed code by entering your listing address into Google and Clicking on the Map
- Find the “Gear” icon at the bottom right of the full size Google Map Screen and click on it
- Click on Embed or Share, click on Embed Map
- Click on the Size and choose custom size: Enter 660 and 300
- Copy the embed code and paste it into the Map Box
- Add Additional Details
- Select the Property Type, Location, and Status
- Click “Save Draft”
You have created the IMPress Listing.
Now we want to make it a Single Property Website.
Go to the Single Listing Template Selector and Select each the 5 Listing Templates and click the “Preview” button to see how it looks.
Classical
Elegant
Luxurious
Solid
Spacious
Choose the template that you like best and “Publish” your very own Single Property Website.
What Do You Do With Your New Listing?
First thing I would do is copy the url of the new website you just created and share it with my clients. It should be something like this:
https://www.foxreal.estate/listings/sample-single-property-website-in-seattle-wa
You can go to Godaddy or Network Solutions or wherever and buy a domain and point it to the url you just created if you would like it to have its own unique domain name.
I would share the link on my Facebook Page, Pinterest, Twitter, Google+, and any other Social Media sites you think might help.
Most importantly, in my opinion, is that by following those steps I can now start an archive of Single Property Websites.
https://www.foxreal.estate/listings/
And that page is what I can show my future clients to show them, what a great marketing expert I am and the homes I have listed and sold.
In addition that page and the listings will be increasing your SEO or Search Engine Rankings, for long-tailed local real estate searches.
Latest articles

First-time homebuyers are probably eager to find their forever home in the housing market. However, there’s plenty of mystery behind the buying landscape, how to purchase and other considerations they should make.

Unlock the potential of content marketing in real estate with actionable strategies designed to boost your online presence and engage clients effectively.
-
The Importance of Google Rankings for Real Estate Agents Over the past fifteen years, I’ve seen how a good Google ranking can make or break a real estate business. Higher rankings mean more people seeing


BECOME A MEMBER
Become A Free DIY Real Estate Marketing Member & Get Access To:
LARGEST COLLECTION OF
Real Estate Marketing e-Books, Guides, Templates, & whitepapers
ON THE INTERNET
+ OVER 70 How To Website Training Videos including; WordPress, Agent Evolution Themes, & IDX Broker
+ DIY Real Estate Marketing Tips and Strategies Delivered to Your Inbox
Share this article
recent posts

Written by : jasonfox
Jason Fox - Real Estate Marketing
Business: We build WordPress Real Estate Websites with IDX
Me: #GoHawks, #BringBackTheSonics, #MaybeNextYearMariners, #ILoveMyKids #SeattleSunLover #SeattleWaterLover #BFF
Blog: Focuses on Wordpress Websites, Content Management, SEO Services, SEM Campaigns, Social Media Marketing, Email Marketing, Beautiful Design, IDX, and more.
Those are great looking single property sites! I’m leaving Brivity and seeking an alternative. Will this pack work on WP site that is not based on the Agent Evolution platform? I’m on Elegant Themes.
Stephanie,
Yes they will work on most WordPress themes.
Is there a way to do this on some other site and just pay a small fee for the posting? I don’t have a wordpress site at the moment, but would like to make one of these today. Or do you just recommend I do something like Everdwell for now? Thanks.
That particular method has to be done using WordPress. There are however, many different single property website services. Listing to Leads, Postlets, or Agent Marketing.
If I have a WP site. I would like to create headers for my Yard arms sales signs and simply put :
Too see this home go to : buythishome.ca/101
The 101 being the house number or just a number and when they go there it will either show the listing or play my video of the home that is already on my present website. Then I do not need to create other websites per say?
sorry meant to add that I can have as many /101 /102 etc homes as \i have listings
Hope this makes sense
Hello Andy, thanks for stopping by. No you would not need any other websites.
Ei, send on my email the links of templates single listings for impress listing plugin of WordPress.. you site says to signup free for download but i cant found download links.. help me and thanks for you help
Gabriel, If you join the Members area and scroll to the bottom you will see: IMPress Agents Custom Template Themes
Learn more about the IMPress Agent Plugin:
Single Property Websites
IMPress Suite of Plugins
Directions:
wp-listings-templates-install-instructions
Themes:
single-listing-classical
single-listing-elegant
single-listing-luxurious
single-listing-solid
single-listing-spacious
The templates are the single-listing-…
Hi this is a great approach, and I uploaded everything as described. Unfortunately the wp dashboard says the themes are missing CSS style sheets and are incomplete or broken somehow. Also, when I tried to view it from the single property dropdown, the only option is ‘default’ so unable to select the theme from the listing as described. Disappointing.
I can not locate IMPress Agents Custom Template Themes anywhere on the member site. Am I missing something?
Moses, I am not sure what happened to them… but I have re-added them as the last clickable box under “DOWNLOAD ANY GUIDES YOU NEED”.