
How To Add Custom Fonts to WordPress
Give your WordPress Site a little Snazz by Adding a Custom Font
“Good typography or bad typography – which one would you think might make a reluctant reader more likely to give up? Typography (good or bad) can make the difference between visitors staying on our sites or going elsewhere.” ~
I am not a Typographer. That is an art form that requires years of study and practice. I am a guy that knows that typography is important. And therefore, has to add custom fonts to WordPress websites from time to time.
Often times the theme you choose will have the fonts you want to use built-in. Often times the good themes will have the option to change fonts in the Customization menu.
If your theme does not have the fonts you want, or there is no option to pick a custom font then you can add fonts to your WordPress website.
What is Typography
Typography
noun: tīˈpäɡrəfē
1. is the art and technique of arranging type to make written language readable and beautiful. The arrangement of type involves selecting typefaces, point size, line length, line-spacing (leading), letter-spacing (tracking), and adjusting the space within letters pairs (kerning).
Nothing makes me want to NOT Read something like having it printed in “Times New Roman”! Please do not use this font… ever.
Font
noun: fänt
1. a particular size, weight and style of a typeface. Each font was a matched set of type, one piece (called a “sort”) for each glyph, and a typeface comprised a range of fonts that shared an overall design.
Typeface
noun: ˈtīpˌfās
1. (also known as font family) is a set of one or more fonts each composed of glyphs that share common design features. Each font of a typeface has a specific weight, style, condensation, width, slant, italicization, ornamentation, and designer or foundry (and formerly size, in metal fonts)
Download The Beginner’s Guide to Using Fonts
by Font Squirrel
Download Free Fonts Guide
*You will need to subscribe to get access to the Beginner’s Guide to Using Fonts and over 100 more Marketing eBooks, Guides, and White papers
What Fonts To Use
I don’t think there is a definitive answer… I mean there are thousand’s and thousand’s of fonts to choose from.
Check out this Web Font Combination Infographic for some inspiration.
For example I recently built a website for a client and used a real nice san serif font called Oswald.

The client approved the website except that he wanted me to use a more professional font.
To him a professional font was a serif style font.
While there really is no “right” answer for what fonts to use there are a couple of thing to keep in mind:
- Make sure that the TypeFace matches your website
- Using a Handwriting style font on a Law Website probably does not work
- Using the same font for the entire site works fine… but to add contrast try:
- Using a combination of Serif and San Serif Fonts
- Break up font by using Different sizes, colors, bold, italic, and spacing
- Do not use fonts illegally!
- There are Free Fonts and there are Fonts that require payment
- If a Font requires payment (or a license) and you display it on your website without the license this is illegal.
How to Add Custom Fonts To WordPress
There are many ways to do this I will cover 3:
1. Simple – “Use Any Font” plugin
2. Hard – Google Fonts
3. Difficult (preferred) – Font Squirrel
You may be asking why on earth would I want to choose anything except the Simple option? If you don’t want to add another code heavy plugin to your WordPress website, and make sure that you have the best option for all browsers and devices.
1. Use Any Font Plugin

This plugin is pretty easy to use and allows you to upload custom fonts.
The developer only allows you to upload 1 font for free… you will need to “donate” $10 to get unlimited fonts.
You will need to download your Font or Fonts before you set up the plugin.
To find the font that you would like to use I suggest you visit:
FREE FONTS:
LICENSED FONTS:
How To Set Up “Use Any Font”
 Screenshot #2. Use Any Font Plugin Setup
- Screenshot #3. Assign font directly from WordPress Editor
- Screenshot #4. Font list not showing in editor.
- Screenshot #5. Disable font list in editor.


2. How To Use Google Fonts
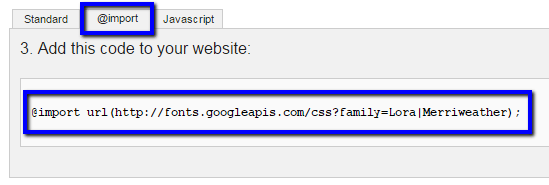
- Visit the Google Fonts website: Google.com/fonts
- Choose the font or fonts that you would like to add to your WordPress Website by click the “Add to Collection” button.
- The font or fonts that you choose will be displayed at the bottom of the screen for your review when you are done choosing your fonts click the “Use” button.
- Find the box that allows you to copy the @import code

- I added 2 fonts to this collection: “Lora and Merriweather”
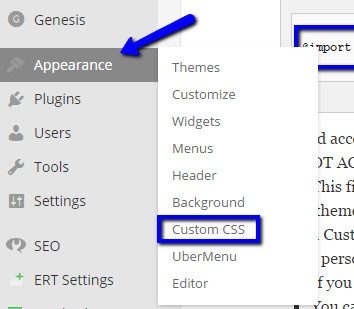
- You will need access to your sites CSS code
- DO NOT ACCESS YOUR THEMES CSS.STYLE (or primary) CSS Stylesheet
- This file will get overwritten every time you update your theme
- Many themes will come with a Custom CSS option
- I add a Custom CSS section to every website I build
- I personally use the “Simple Custom CSS” Plugin: Download Simple Custom CSS Plugin
- If you use the Jetpack Plugin you can activate their Custom CSS option
- You can also add a Child CSS.style sheet if you are so inclined
- Once you have added the Simple Custom CSS plugin or Activated the Custom CSS option on Jetpack open the page
- Paste the @import code you had previously copied on the Google/Fonts website onto your CSS stylesheet
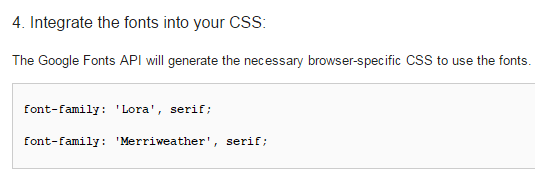
- Now we need to tell your website when to use this new font by adding the Font Name to the Font CSS Styles
- Go back to the Google Fonts Page and copy the Font Names.

- font-family: ‘Lora’, serif;
- font-family: ‘Merriweather’, serif;
- Go back to your Custom CSS Page
- Generally you can adjust most fonts, not including Titles or Headings, with this code:
body, p, a, blockquote, strong, b, italic, i, em, ul, lo, input, textarea {

font-family: 'Lora', serif;

}- Generally you can adjust your Titles and Headings with this code:
h1, h2, h3, h4, h5, h6, h1 a, h2 a, h3 a, h4 a, h5 a, h6 a {

font-family: 'Merriweather', serif;

} - Add the above code to your Custom CSS page (change the name of the font-family to the name that you choose from Google Fonts.
- Save your Custom CSS page
- Go back to the Google Fonts Page and copy the Font Names.
- DO NOT ACCESS YOUR THEMES CSS.STYLE (or primary) CSS Stylesheet

3. How To Use Font Squirrel
1. Find a Font
2. FREE FONTS:
3. LICENSED FONTS:
Thank you to WPSites for this Step by Step Tutorial
4. Download the font
5. Unzip the font package
6. Visit Font Squirrel WebFont Generator
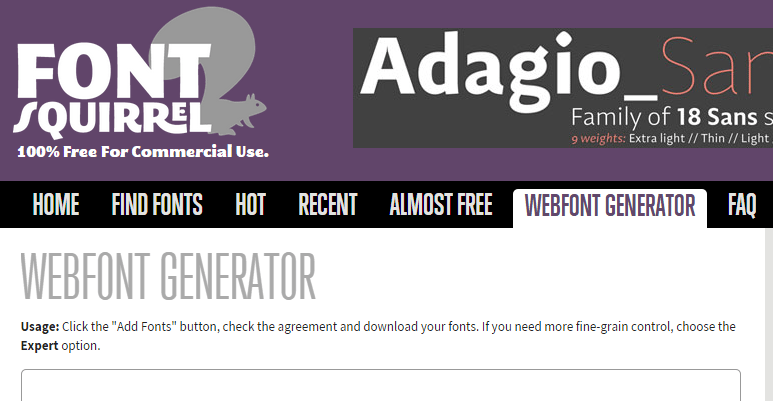
7. Add Font Files, Select Optimal, Agree to terms and “Download Your Kit”
8. Create a new folder called “Custom Fonts” and drag all the files from your “Kit” to your new folder (we do not need the “Specimen” files)
9. Open Filezilla (open source FTP )
10. Login to your FTP or SFTP (you can get this login information from your hosting provider)
11. Click on WP Content
12. Click on Themes
13. Click on your Active Theme or Child Theme
14. Upload your “Custom Fonts” folder into your Active Theme or Child Theme’s folder
15. Open your Active Theme or Child Theme Custom CSS Page
- DO NOT ACCESS YOUR THEMES CSS.STYLE (or primary) CSS Stylesheet
- This file will get overwritten every time you update your theme
- Many themes will come with a Custom CSS option
- I add a Custom CSS section to every website I build
- I personally use the “Simple Custom CSS” Plugin: Download Simple Custom CSS Plugin
- If you use the Jetpack Plugin you can activate their Custom CSS option
- You can also add a Child CSS.style sheet if you are so inclined
- Once you have added the Simple Custom CSS plugin or Activated the Custom CSS option on Jetpack open the page

16. Generally you can adjust most fonts, not including Titles or Headings, with this code:
body, p, a, blockquote, strong, b, italic, i, em, ul, lo, input, textarea {

font-family: 'Lora', serif;

}
17. Generally you can adjust your Titles and Headings with this code:
h1, h2, h3, h4, h5, h6, h1 a, h2 a, h3 a, h4 a, h5 a, h6 a {

font-family: 'Merriweather', serif;

}- Add the above code to your Custom CSS page (change the name of the font-family to the name that you choose from Google Fonts.
- Save your Custom CSS page
18. If your fonts do not activate you may have to manually add the CSS Files to your Custom CSS Page
CSS CODE:
@font-face {

font-family: 'fontname';

src: url('/wp-content/themes/theme-name/customfonts/fontname-webfont.eot');

src: url('/wp-content/themes/theme-name/customfonts/fontname-webfont.eot?#iefix') format('embedded-opentype'),

url('/wp-content/themes/theme-name/customfonts/fontname-webfont.woff2') format('woff2'),

url('/wp-content/themes/theme-name/customfonts/fontname-webfont.woff') format('woff'),

url('/wp-content/themes/theme-name/customfonts/fontname-webfont.ttf') format('truetype'),

url('/wp-content/themes/theme-name/customfonts/fontname-webfont.svg#artbrushmedium') format('svg');

font-weight: normal;

font-style: normal;

}
Conclusion
Using Custom Fonts on your WordPress Website is easy enough that you should not be using Arial and Times New Roman.
When I add custom fonts to my WordPress Websites I use Google Fonts or the Font Squirrel method.
If you are not comfortable accessing the FTP and CSS style sheets try the “Use Any Font” Plugin.
post contents
Give your WordPress Site a little Snazz by Adding a Custom Font
“Good typography or bad typography – which one would you think might make a reluctant reader more likely to give up? Typography (good or bad) can make the difference between visitors staying on our sites or going elsewhere.” ~
I am not a Typographer. That is an art form that requires years of study and practice. I am a guy that knows that typography is important. And therefore, has to add custom fonts to WordPress websites from time to time.
Often times the theme you choose will have the fonts you want to use built-in. Often times the good themes will have the option to change fonts in the Customization menu.
If your theme does not have the fonts you want, or there is no option to pick a custom font then you can add fonts to your WordPress website.
What is Typography
Typography
noun: tīˈpäɡrəfē
1. is the art and technique of arranging type to make written language readable and beautiful. The arrangement of type involves selecting typefaces, point size, line length, line-spacing (leading), letter-spacing (tracking), and adjusting the space within letters pairs (kerning).
Nothing makes me want to NOT Read something like having it printed in “Times New Roman”! Please do not use this font… ever.
Font
noun: fänt
1. a particular size, weight and style of a typeface. Each font was a matched set of type, one piece (called a “sort”) for each glyph, and a typeface comprised a range of fonts that shared an overall design.
Typeface
noun: ˈtīpˌfās
1. (also known as font family) is a set of one or more fonts each composed of glyphs that share common design features. Each font of a typeface has a specific weight, style, condensation, width, slant, italicization, ornamentation, and designer or foundry (and formerly size, in metal fonts)
Download The Beginner’s Guide to Using Fonts
by Font Squirrel
Download Free Fonts Guide
*You will need to subscribe to get access to the Beginner’s Guide to Using Fonts and over 100 more Marketing eBooks, Guides, and White papers
What Fonts To Use
I don’t think there is a definitive answer… I mean there are thousand’s and thousand’s of fonts to choose from.
Check out this Web Font Combination Infographic for some inspiration.
For example I recently built a website for a client and used a real nice san serif font called Oswald.
The client approved the website except that he wanted me to use a more professional font.
To him a professional font was a serif style font.
While there really is no “right” answer for what fonts to use there are a couple of thing to keep in mind:
- Make sure that the TypeFace matches your website
- Using a Handwriting style font on a Law Website probably does not work
- Using the same font for the entire site works fine… but to add contrast try:
- Using a combination of Serif and San Serif Fonts
- Break up font by using Different sizes, colors, bold, italic, and spacing
- Do not use fonts illegally!
- There are Free Fonts and there are Fonts that require payment
- If a Font requires payment (or a license) and you display it on your website without the license this is illegal.
How to Add Custom Fonts To WordPress
There are many ways to do this I will cover 3:
1. Simple – “Use Any Font” plugin
2. Hard – Google Fonts
3. Difficult (preferred) – Font Squirrel
You may be asking why on earth would I want to choose anything except the Simple option? If you don’t want to add another code heavy plugin to your WordPress website, and make sure that you have the best option for all browsers and devices.
1. Use Any Font Plugin
This plugin is pretty easy to use and allows you to upload custom fonts.
The developer only allows you to upload 1 font for free… you will need to “donate” $10 to get unlimited fonts.
You will need to download your Font or Fonts before you set up the plugin.
To find the font that you would like to use I suggest you visit:
FREE FONTS:
LICENSED FONTS:
How To Set Up “Use Any Font”
- Screenshot #2. Use Any Font Plugin Setup
- Screenshot #3. Assign font directly from WordPress Editor
- Screenshot #4. Font list not showing in editor.
- Screenshot #5. Disable font list in editor.
2. How To Use Google Fonts
- Visit the Google Fonts website: Google.com/fonts
- Choose the font or fonts that you would like to add to your WordPress Website by click the “Add to Collection” button.
- The font or fonts that you choose will be displayed at the bottom of the screen for your review when you are done choosing your fonts click the “Use” button.
- Find the box that allows you to copy the @import code
- I added 2 fonts to this collection: “Lora and Merriweather”
- You will need access to your sites CSS code
- DO NOT ACCESS YOUR THEMES CSS.STYLE (or primary) CSS Stylesheet
- This file will get overwritten every time you update your theme
- Many themes will come with a Custom CSS option
- I add a Custom CSS section to every website I build
- I personally use the “Simple Custom CSS” Plugin: Download Simple Custom CSS Plugin
- If you use the Jetpack Plugin you can activate their Custom CSS option
- You can also add a Child CSS.style sheet if you are so inclined
- Once you have added the Simple Custom CSS plugin or Activated the Custom CSS option on Jetpack open the page
- Paste the @import code you had previously copied on the Google/Fonts website onto your CSS stylesheet
- Now we need to tell your website when to use this new font by adding the Font Name to the Font CSS Styles
- Go back to the Google Fonts Page and copy the Font Names.
- font-family: ‘Lora’, serif;
- font-family: ‘Merriweather’, serif;
- Go back to your Custom CSS Page
- Generally you can adjust most fonts, not including Titles or Headings, with this code:
body, p, a, blockquote, strong, b, italic, i, em, ul, lo, input, textarea {

font-family: 'Lora', serif;

}- Generally you can adjust your Titles and Headings with this code:
h1, h2, h3, h4, h5, h6, h1 a, h2 a, h3 a, h4 a, h5 a, h6 a {

font-family: 'Merriweather', serif;

} - Add the above code to your Custom CSS page (change the name of the font-family to the name that you choose from Google Fonts.
- Save your Custom CSS page
- Go back to the Google Fonts Page and copy the Font Names.
- DO NOT ACCESS YOUR THEMES CSS.STYLE (or primary) CSS Stylesheet
3. How To Use Font Squirrel
1. Find a Font
2. FREE FONTS:
3. LICENSED FONTS:
Thank you to WPSites for this Step by Step Tutorial
4. Download the font
5. Unzip the font package
6. Visit Font Squirrel WebFont Generator
7. Add Font Files, Select Optimal, Agree to terms and “Download Your Kit”
8. Create a new folder called “Custom Fonts” and drag all the files from your “Kit” to your new folder (we do not need the “Specimen” files)
9. Open Filezilla (open source FTP )
10. Login to your FTP or SFTP (you can get this login information from your hosting provider)
11. Click on WP Content
12. Click on Themes
13. Click on your Active Theme or Child Theme
14. Upload your “Custom Fonts” folder into your Active Theme or Child Theme’s folder
15. Open your Active Theme or Child Theme Custom CSS Page
- DO NOT ACCESS YOUR THEMES CSS.STYLE (or primary) CSS Stylesheet
- This file will get overwritten every time you update your theme
- Many themes will come with a Custom CSS option
- I add a Custom CSS section to every website I build
- I personally use the “Simple Custom CSS” Plugin: Download Simple Custom CSS Plugin
- If you use the Jetpack Plugin you can activate their Custom CSS option
- You can also add a Child CSS.style sheet if you are so inclined
- Once you have added the Simple Custom CSS plugin or Activated the Custom CSS option on Jetpack open the page
16. Generally you can adjust most fonts, not including Titles or Headings, with this code:
body, p, a, blockquote, strong, b, italic, i, em, ul, lo, input, textarea {

font-family: 'Lora', serif;

}
17. Generally you can adjust your Titles and Headings with this code:
h1, h2, h3, h4, h5, h6, h1 a, h2 a, h3 a, h4 a, h5 a, h6 a {

font-family: 'Merriweather', serif;

}- Add the above code to your Custom CSS page (change the name of the font-family to the name that you choose from Google Fonts.
- Save your Custom CSS page
18. If your fonts do not activate you may have to manually add the CSS Files to your Custom CSS Page
CSS CODE:
@font-face {

font-family: 'fontname';

src: url('/wp-content/themes/theme-name/customfonts/fontname-webfont.eot');

src: url('/wp-content/themes/theme-name/customfonts/fontname-webfont.eot?#iefix') format('embedded-opentype'),

url('/wp-content/themes/theme-name/customfonts/fontname-webfont.woff2') format('woff2'),

url('/wp-content/themes/theme-name/customfonts/fontname-webfont.woff') format('woff'),

url('/wp-content/themes/theme-name/customfonts/fontname-webfont.ttf') format('truetype'),

url('/wp-content/themes/theme-name/customfonts/fontname-webfont.svg#artbrushmedium') format('svg');

font-weight: normal;

font-style: normal;

}
Conclusion
Using Custom Fonts on your WordPress Website is easy enough that you should not be using Arial and Times New Roman.
When I add custom fonts to my WordPress Websites I use Google Fonts or the Font Squirrel method.
If you are not comfortable accessing the FTP and CSS style sheets try the “Use Any Font” Plugin.
Latest articles

First-time homebuyers are probably eager to find their forever home in the housing market. However, there’s plenty of mystery behind the buying landscape, how to purchase and other considerations they should make.

Unlock the potential of content marketing in real estate with actionable strategies designed to boost your online presence and engage clients effectively.
-
The Importance of Google Rankings for Real Estate Agents Over the past fifteen years, I’ve seen how a good Google ranking can make or break a real estate business. Higher rankings mean more people seeing


BECOME A MEMBER
Become A Free DIY Real Estate Marketing Member & Get Access To:
LARGEST COLLECTION OF
Real Estate Marketing e-Books, Guides, Templates, & whitepapers
ON THE INTERNET
+ OVER 70 How To Website Training Videos including; WordPress, Agent Evolution Themes, & IDX Broker
+ DIY Real Estate Marketing Tips and Strategies Delivered to Your Inbox
Share this article
recent posts

Written by : jasonfox
Jason Fox - Real Estate Marketing
Business: We build WordPress Real Estate Websites with IDX
Me: #GoHawks, #BringBackTheSonics, #MaybeNextYearMariners, #ILoveMyKids #SeattleSunLover #SeattleWaterLover #BFF
Blog: Focuses on Wordpress Websites, Content Management, SEO Services, SEM Campaigns, Social Media Marketing, Email Marketing, Beautiful Design, IDX, and more.