

Contents
Adding Community Pages to a Website is One of the Best Ways for Real Estate Agents to Get Noticed Locally
Buyers don’t buy a house, they buy a community. Being an authority on the communities you serve is key to building trust with buyers. A well-thought-out website with community pages is a great start.
The goal of any good real estate site is to generate leads, legitimize your brand, be an authority, multiply your web presence and have a home for your marketing. We call this G.L.A.M.R: Generate, Legitimacy, Authority, Multiply, Residence.
In 2024 this is still important but also requires you to adapt to new real estate trends. For example, following the recent NAR/DOJ settlement, IDX Broker is rolling out updates that allow agents to add custom offers of compensation to their own listings, more transparency and trust. This affects how listings will display on your site and keeps you compliant while serving your clients. Adding community pages helps optimize your G.L.A.M.R., you’ll be the local expert with clients and Google.
In the following tutorial, we will show you how to quickly set up community pages using IDX Broker, incorporating the latest IDX features.
Before You Begin
Your IDX Feed
Before we get started, you’ll need to subscribe to an IDX feed. For this tutorial, we’re focusing on IDX Broker because it’s one of the best. At Jason Fox Real Estate Marketing, we’ve been installing their plugins into WordPress websites for years, and the service keeps improving.
In addition to features like the Precision Listings Template Suite, Azure Maps, and Social Pro, IDX Broker remains highly customizable, giving you access to MLS data that can influence branding, lead production, and SEO. Themes like Houzes and WPResidence take advantage of IDX Broker’s flexibility, simplifying web design and optimizing performance.
Plus, their stellar customer service makes a big difference. While some IDX providers limit support to email, IDX Broker’s team offers real-time help, so you’re never left waiting during an issue.
Learn more about using IDX Broker
The development team at IDX Broker also holds regular webinars and tutorials for anyone wanting to learn more about their service.
Set up IDX on WordPress
Once you’ve subscribed to IDX Broker, the next step is to integrate it into your WordPress site. Start by installing the IDX Broker plugin and activating it. This connects your site to MLS listings, allowing you to display dynamic, up-to-date property data.
In 2024, setting up IDX on WordPress remains straightforward. The IDX Broker dashboard provides easy access to customization tools that enhance your site’s functionality and improve the user experience for both agents and potential buyers.

Types of communities
In any MLS region there are several types of communities. At a high level you have counties, cities, and zip codes. At a hyperlocal level you neighborhoods, including unofficial or micro neighborhoods, and subdivisions. Subdivisions may include master-planned communities, villages, retirement, golf, gated, luxury, condo, townhome, etc.
For this tutorial we will be skipping the cities and regions and we will get ‘hyperlocal’, focusing on neighborhoods and subdivisions.
Two Ways to Set Up a Community Page Using IDX (2024 Update)
There are two basic ways to add a community page to your website:
- The first is to add a WordPress page and embed it with IDX widgets.
- The second option is to create an IDX subdomain page. The IDX page will live in the menu structure of your site and will have the same header and footer as the rest of the pages but it will be hosted remotely on an IDX subdomain.
Both options stream MLS data into your site and feature powerful lead capture tools. Depending on which option you choose there will be pros and cons.
WordPress Page with imbedded IDX widgets
Pros:
-
- Better SEO value for page
- Pages hosted on primary domain
- More flexible design options
Cons:
-
- More work to create and maintain
- Depending in design and number of widgets page speed may be slower
- Map features not available with Lite account package
IDX Broker Subdomain Pages
Pros:
-
- Easy to set up and maintain. No design skills required
- Includes map with pins for every account level
- Pages are hosted on fast, highly optimized servers. This improves user experience and helps site speed.
Cons:
-
- Less flexibility with page customization
- Page SEO is good but doesn’t have the same potential as a dedicated WordPress page. It is important to note that Google does index and rank subdomain pages.
- Pages hosted externally on IDX subdomain
Both options in IDX Broker—WordPress pages with embedded widgets or IDX subdomain pages—allow agents to display MLS data while capturing leads. Depending on your needs, either option provides effective ways to showcase property listings and enhance user experience.
Navigating IDX Broker Packages and MLS Data
The basic setup for an IDX community page is straightforward, but understanding how your MLS data works within IDX Broker can make the process smoother. Here are the key details based on the account level you’ve selected:
IDX Broker Lite vs. Platinum
If you’re unsure which plan to choose, here’s a quick breakdown:
- Lite: A budget-friendly option for new agents. You can always upgrade later.
- Platinum: Includes advanced features like polygon search, making it easier to define custom areas for your pages.
If you’re unsure which plan will meet your needs, start with Lite and see if it covers your requirements. Upgrading to Platinum gives you more customization options, such as drawing custom areas with polygon search.
To understand the options available with the two packages check out their website and compare the features for yourself.
Understanding MLS Data
Before building out your community pages, explore the data fields available in your MLS. Cities are typically easy to work with as they’re a standard field. However, communities within cities (like neighborhoods or subdivisions) can be more challenging.
- Neighborhood Field: If your MLS includes a neighborhood field, it will make creating neighborhood pages easier. If not, you’ll likely need to rely on subdivision data.
- Subdivision Field: MLSs sometimes handle neighborhoods and subdivisions differently. Some may categorize neighborhoods within subdivisions, while others may not. It’s important to carefully review these fields to ensure you’re working with the right data.
Pro Tip: It’s worth noting that a subdivision name may not be the same as the name listed in the MLS. For example, if you have a subdivision called ‘Meadow Highlands’, you might assume the subdivision to be labeled as such. If however, the ‘Meadow Highlands’ subdivision resides in a larger community, that name may also be incorporated in the field name. Subdivision names may also be abbreviated or include building numbers.
If you want to put together a community page that focuses on a subdivision with multiple buildings you may need to select multiple subdivision names.
You’ll get a good sense of how the data is organized when you see it in your IDX account backend.
Making the Most of IDX Broker Platinum: Polygon Search
If you’re using IDX Broker Platinum, the polygon search feature offers significant advantages. Rather than relying solely on predefined MLS data, you can draw custom boundaries around neighborhoods, subdivisions, or even unofficial/micro-neighborhoods.
- Define Your Own Borders: Sometimes a community may span multiple cities or have loosely defined borders. Using polygon search, you can create custom borders to represent the area exactly how you want. This flexibility is ideal for neighborhoods with multiple interpretations, like Meadowdale, which overlaps both Edmonds and Lynnwood, depending on the source.
- Unofficial Neighborhoods: Polygon search is particularly useful for unofficial or micro-neighborhoods that may not have an official MLS designation. For example, Tangletown in Seattle is considered part of Wallingford in MLS listings, but locals know it as its own distinct community. By using polygon search, you can capture these hyperlocal areas and set yourself apart from other real estate agents.
Pro Tips for Working with MLS Data
- Watch for subdivision spelling errors or variations in names when creating community pages.
- If MLS data isn’t available for specific neighborhoods, consider using tools like Zillow or Redfin to research subdivisions and identify missing data.
- The Zillow trick: Use Zillow’s map and listing details to gather subdivision names when your MLS lacks a dedicated neighborhood field.
IDX Broker Lite: Building a Page with Advanced Search
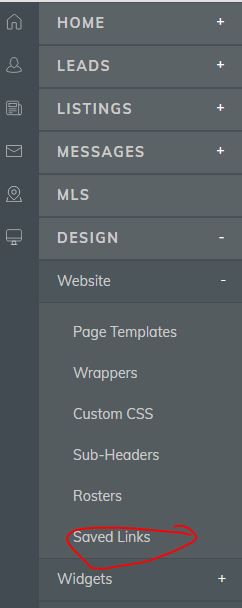 If you’re using IDX Broker Lite, setting up community pages is straightforward. First, log into your IDX dashboard and navigate to the Design tab.
Under Website, select Saved Links to begin building your community pages.
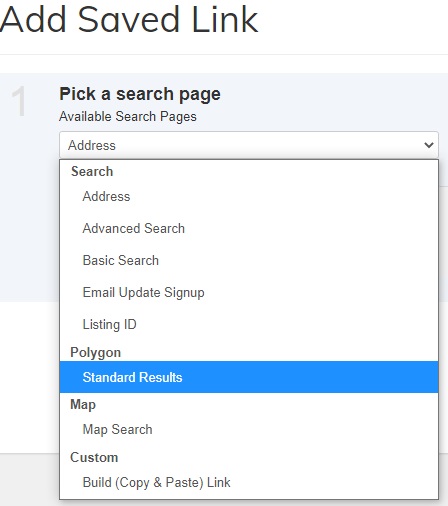
Step 1: Pick a search page.
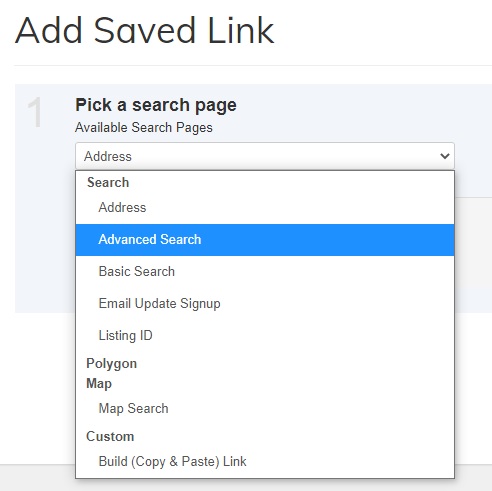 At the ‘Add Saved Link’ screen click on the ‘Available Search Pages’ drop down list. Select ‘Advanced Search’ and click the ‘Next Step’ button.
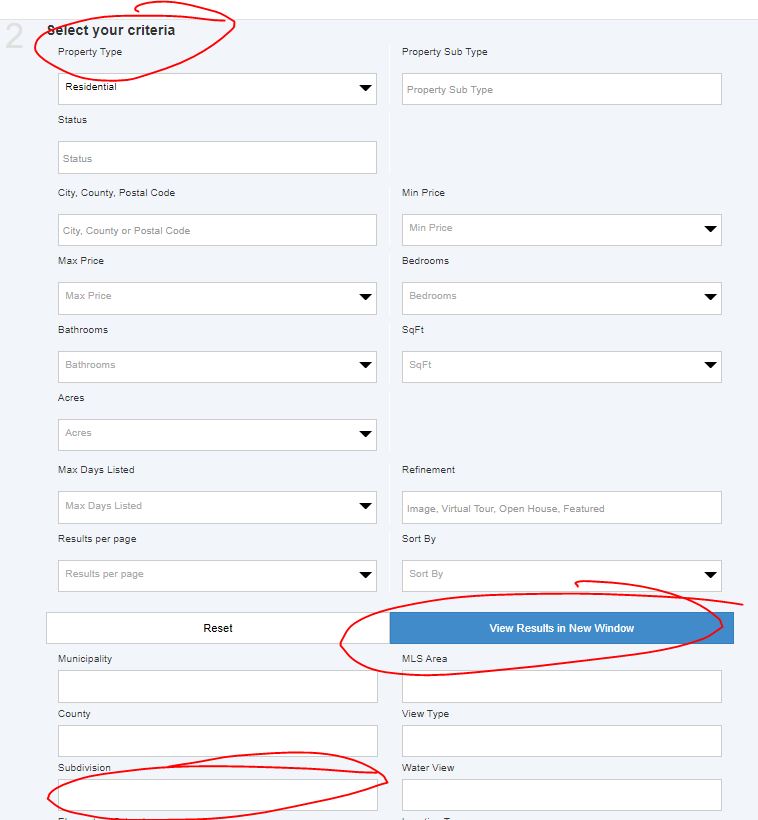
Step 2: Select Your Criteria.
From here you will have a list to ‘Select Your Criteria’. To keep it simple we will just focus on neighborhoods, unofficial neighborhoods, and subdivisions..
2.1 Adding a neighborhood page:
If your MLS has a neighborhood field you can select it from the list. Simply begin typing in the name and the neighborhood should show up.
If there is no neighborhood field you can check with IDX Broker to see if one is available to be added.
If there is not one available you will need to refer to the subdivisions. The only problem is you will need to know the names of the subdivisions. Without a list the easiest way to do this is using the ‘Zillow Trick’:
Pro Tip: “The Zillow trick”. If there is no neighborhood field available you will need to get a little creative. The easiest way is to use Zillow. Zillow has invested millions ingesting and normalizing MLS data and it’s all there to see, for free.
Simply go to Zillow and search for the neighborhood you want to create a page for. They will have a map and listings for the area. From the map go through each of the listings and look for the listed subdivisions. You should be able to get most of the subdivisions this way.
There is a chance a subdivision may not be listed at the time you are doing this so it’s not a bad idea to revisit this from time to time.
I did this recently for the Shore Acres neighborhood in St Petersburg Florida and got a return of 15 subdivisions using this method.
On the off chance Zillow doesn’t feature your neighborhood try a competing site like Redfin or Trulia. If that doesn’t work, Google it.
2.2 Unofficial/Micro neighborhoods:
This one is tricky and much better suited for a polygon search. If unofficial neighborhood happens to be made up of subdivisions and you know the names then you should be set. Otherwise you will need to refer back to the ‘Zillow trick’.
The Zillow trick doesn’t always work though. I tried this method for the unofficial neighborhood Tangletown that I mentioned earlier. I found one listing on Zillow which referenced Wallingford as the neighborhood. The search picked up Tangletown in the description data but listed no subdivision.
If I were to want to build a page for this unofficial, or micro neighborhood I would need the Polygon search to really do it justice. I would also need to decide whether it was worth adding to begin with.
2.3 Subdivisions:
Watch for these, sometimes there are spelling errors and multiple versions of the same name. A subdivision made up of multiple buildings with units may be listed separately. I’ve seen subdivisions with the same building listed three times because a unit number was included or there was a spelling error.
Once you’ve selected your neighborhood or subdivisions click on the ‘View Results in New Window’ button. You will see a page view with a map. Be sure to verify that the neighborhoods or subdivisions you’ve selected are correct. If the map shows a listing that is far away from the area you are trying to represent check the listings details to see what the subdivision is listed as. An MLS may have multiple subdivisions with similar names. If you find one that doesn’t belong just go back to the page and delete it from the list.
2.4 Once you are satisfied with your selection click on the ‘Next Step’ button.
Step 3: Name your search and set the preference.
Give the page a title and add you Meta Tag description. You also have the option to add a Sub-header. The sub-header will display on your page above the listings.
Pro Tip: If you copy/paste your text from a webpage or a Word document into the ‘Sub-header’ editor the formatting may not carry over. A quick way to fix this is to past the text plain text editor like Notepad or TextEdit. You can copy /paste the plain text into the Sub-header editor and format it from there.
Once you are done filling in everything to your liking click on the ‘Save & Create another link’ button.
IDX Broker Platinum: Building a Page with Polygon Search
Setting up a Page Using Polygon Search
If you’re using IDX Broker Platinum, the Polygon Search feature allows you to create hyperlocal community pages by drawing custom boundaries around a specific area.
Here’s how to set up a page:
Step 1: Pick a search page.
 At the ‘Add Saved Link’ screen click on the ‘Available Search Pages’ drop down list. Select ‘Polygon – Standard Results’ and click the ‘Next Step’ button
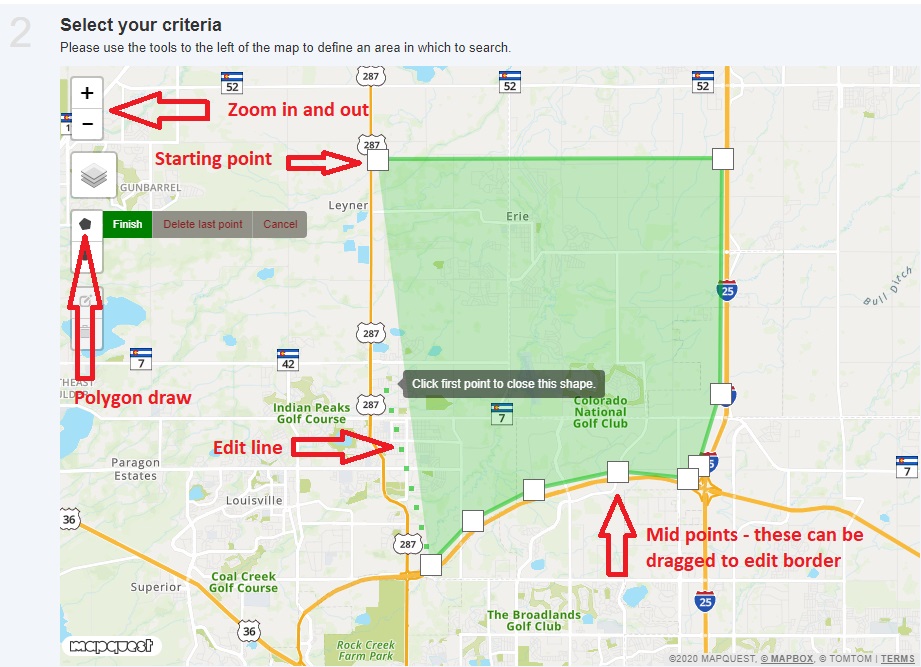
Step 2: Select Your Criteria.
A map will appear for you to define the borders of your community.
On the top left side of the map you have the zoom in/zoom out buttons. Zoom out and move the map manually to find your community.
Pro Tip: If you don’t know the borders for the community you want to outline simply Google the neighborhood and search for a site that has already mapped the area.
Neighborhoods.com covers a lot of the major metropolitan areas and features maps of most of their communities. Zillow is also a great reference for maps but a little less consistent with how they are outlined.
2.1 Find your starting point:
Once you have located the area you will be ready to draw your outline. On the left side of the map there will be two buttons containing a polygon and a circle shape.
The circle option selects a circular area, often used to show homes within a certain distance of a specific location.
The Polygon option is used to draw custom boundaries around an area. We will be using the polygon option as it offers the flexibility we need for our communities.
With the polygon option selected find a good starting point on your map and click to set your first marker.
2.2 Placing the next marker:
Now, find the second point on your map and click to add another marker.
Pro Tip: If you make a mistake when laying out your border markers you can select ‘Delete last point’ from the polygon editor. Click once for each point you want to delete. Or select ‘Cancel’ to start over.
2.3 The rest of the map:
Repeat this step around the area you want to select. If the area is a square you will just need to select the four corners. If the area has an unusual shape you may need to place several incremental points through the map to get everything.
2.4 Close your outline:
When you have selected the areas you intend to outline you will need to close the outline by selecting the first point. Your community should now be outlined.
Pro Tip: When you build a page using the polygon search you are creating a location based query. Each point you add is a coordinate based on the latitude and longitude. These coordinates are added to the query which can get rather long and create a problem with some browsers. Not to worry, you’ll get a helpful message if you exceed the recommended length. If it’s too long try removing a few of the points to simplify your outline.
2.5 Editing your map
If your map isn’t perfect don’t worry, you can easily edit it. On the left side of the map towards the bottom of the button options there is an edit and a trash option.
Select trash if you want to delete your selection and start over. Select the edit to see the map points you’ve laid out. You can select any point and drag it to the desired spot. If you don’t like the edits you’ve made click edit/cancel to undo them.
2.6 Additional filtering:
With your area completed you can now add any additional filtering you’d like such as Property Type, price ranges, bedrooms, etc.
2.7 Once you have set your filtering click on ‘Next Step’.
Step 3: Name your search and set the preference.
Give the page a title and add you Meta Tag description. You also have the option to add a Sub-header. The sub header will display on your page above the listings.
Once you are done filling in everything to your liking click on the ‘Save & Create another link’ button.
Adding New Pages to Your WordPress Site
Once you’ve got your first page done you simply repeat the steps for each additional page you want to add. When the page are ready you can add them like you would any other menu page in WordPress.
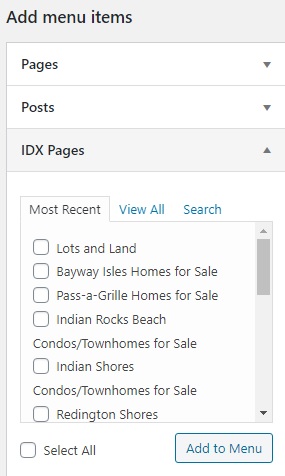 In the Add Menu Items you’ll see a list for IDX Pages. Just select the pages you want to add an place them where you want them.
The pages will IDX Pages displayed in WordPress under the IMPress widget navigation. You will want to make any edits to the pages in the IDX account but you can see what the page will look like here.
You may notice that some of your IDX pages aren’t showing, this is normal. It takes a few minutes for a newly created page to show up in the menu.
Note: If your site is not yet live your pages will not display the wrapper settings of map pins. Wrapper settings are your websites header and footer. Once the site is live the pages will look like any other page on your website. The pages will evening take on the font attributes from your sites global settings.
Summary
Setting up community pages using IDX Broker, whether Lite or Platinum, is a powerful way to enhance your website’s SEO. It positions you as a local real estate expert.
With IDX Broker, you can create tailored, data-driven pages that improve user experience. This gives you a competitive edge in the market.
Features like polygon search and customization tools make it easier to build hyperlocal pages that stand out.
Let us know if you have any questions or need further assistance!
FAQ: IDX Broker Community Pages
What’s the difference between IDX Broker Lite and Platinum?
Lite is more budget-friendly and provides essential IDX features. Platinum offers advanced options like Polygon Search, which lets you draw custom boundaries for hyperlocal areas.
How does the Polygon Search work?
Polygon Search allows you to outline specific areas on a map to display listings within custom-defined neighborhoods, subdivisions, or unofficial/micro-communities.
Can I change plans between Lite and Platinum?
Yes, you can start with Lite and upgrade to Platinum if needed. IDX Broker allows flexibility to meet your evolving needs.
How do I add community pages to my WordPress site?
You can either embed IDX widgets into WordPress pages or use IDX subdomain pages. Both options stream MLS data and include lead capture tools.
What is the best way to create hyperlocal community pages?
Using the Polygon Search in IDX Broker Platinum is ideal for creating custom hyperlocal pages, especially for unofficial or micro-neighborhoods that don’t appear in standard MLS data.
How do I use MLS data fields for community pages?
Look for neighborhood or subdivision fields in your MLS. If your MLS doesn’t include these fields, use subdivision data or rely on tools like Zillow for additional research.
How can I ensure my IDX community pages are SEO-friendly?
Choose the WordPress page option for better SEO potential and customize your page with titles, meta descriptions, and relevant keywords. IDX subdomain pages are also indexed by Google but offer slightly less SEO flexibility.

Written by : Jeff Kind
Jeff Kind- Real Estate Marketing Business: We build WordPress Real Estate Websites with IDX Me: #GoHawks, #DiverAlertNetwork, #SeattleSoftwareQualityAssuraceGroup, #SeattleHikers, #ILoveMyFamily Blog: Focuses on Wordpress Websites, Content Management, SEO Services, Social Media Marketing, Email Marketing, Beautiful Design, IDX, and more.
Very useful information. Thank you for sharing.
Hey Jason Fox,
Aadarsh this side. It is my first time commenting on your blog page and am glad to say that you have shared an excellent content providing great tips for creating real estate community page with Idx broker. I appreciate the way you have explained and presented things along with helpful steps that are so clear to understand. Your each listed steps are well-elaborated and easy to follow. Considering your steps will be helpful.
After reading this guide i gain ideas and am sure that this post will surely help lots of people & readers.
Very informative and keep sharing more similar post.
Thanks,
-Aadarsh
Thank you for sharing useful and very informative content. keep posting more content