HOW TO ORDER INSTALL AND OPTIMIZE YOUR IDX BROKER PLUGIN ON WORDPRESS [Updated 2023]
Over the last decade I have installed thousands of IDX Broker plugins onto different WordPress websites. Agent sites, team sites, commercial sites, brokerage sites, property management sites. I have built sites for an agent in nearly every 50 states, Canada and Mexico.
I have installed IDX Broker on all kinds of different themes such as; Genesis, Avada, Equity, Thesis, Divi, X Theme, Betheme, Elegant Themes, WP Residence and many more that I cannot remember.
That is what I love about the IDX Broker plugin is that while the technology keeps changing and the needs of the agents keep evolving the plugin just keeps working.
Over the years I have been persuaded to install different IDX services, most have gone out of business or completely changed business models and left clients without service. But, IDX Broker has always been there and taken care of their clients.
What makes IDX broker so special is the same thing that many “gurus” have condemned them for. They host all the IDX information on their own highly optimized servers.
Many of these so called “gurus” over the years have told you not to use IDX Broker because you would not get the SEO benefits of having the data on your server.
Here Is Why That Information Is Bogus:
- Trying to get SEO out of listings is a loosing battle. We can not compete with Zillow, Redfin, Trulia, Realtor.com, etc.
- If you try to store all the listing data on your sites server it will slow your database down to a near halt.
- If you are responsible for making sure that all the data that is stored on your server is correct it will slow your real estate business down to a near halt.
- By completing the suggested install instructions you create a subdomain on your site that, according to Google, is just as efficient as a subfolder for SEO.
I have rated the WordPress IDX Plugins in great detail here: BEST IDX PLUGINS REVIEWED
It is important to keep in mind that we are talking about implementing your MLS data into a self-hosted WordPress website. Full transparency I do believe that other proprietary services have built a superior IDX service. Those services are generally going to cost you at least $1k a month plus set-up fee. So to be fair it is a slightly different ball game.
If you are convinced that installing IDX Broker into your self-hosted WordPress website is the best option for you then continue reading and we will walk through:
TABLE OF CONTENTS
HOW TO ORDER YOUR IDX SERVICE
This may seem like a silly place to start, I mean we all know how to order things online these days, but there are a few things that we should discuss.
The first thing you will need to do is go to the sign up form: IDX BROKER SIGN UP FORM
(If you use this link I will earn a small commission. It will also save you the $100 set up fee)
- CHOOSE YOUR PRODUCT: IDX BROKER LITE or IDX BROKER PLATINUM
- You will receive many upgrades with the platinum version that you can see here: Compare Lite vs. Platinum
- The biggest differences are that the Platinum offers:
- Polygon Search on the Map Search
- You can create Map Search Widgets
- Social Media Login for Lead Generation
- More control over the MLS data for detailed search and results pages
- The ability to add sold data to your feed if it is available with your MLS
- $20 month additional
- AGENT/COMPANY:
- This part is self explanatory
- Make sure to enter your Managing Brokers email address as they will probably be required to sign a form for your approval
- ACCOUNT SETUP:
- Select the MLS that you are licensed in
- It is important to note that some MLS’s add a “Data Management Fee”
- If you choose Platinum and would also like to display your sold listings and it is available with your MLS check the “Sold Data” box
- Additional Agent Seats:
- If you are a single Agent or Broker choose: No Add On
- If you are a team of 2 Agents or Brokers choose: Team Account 2 Users
- If you are a team or office of 3-10 Agents or Brokers choose: Office 3-10 Multi Users
- If you are more than 10 select the corresponding number of agents in your office to the Multi User Seats option
- Select the MLS that you are licensed in
- Agree to the Terms of Service and Click Continue
- Enter Your Payment Information and Continue
- Your card will not be billed unto you have been approved and your account has been created
You will receive an email from IDX Broker letting you know that your order has been started.
The next part really depends on what MLS, Brokerage and Office you are a part of. The Approval Process can take a couple of hours or I have seen it take a couple weeks.
Make sure to keep your eye out for further instructions from IDX Broker and possibly your MLS.
The approval process most often involves sending electronic forms to the agent and broker to sign. We use an online document signing service to request the signatures. Once they are received IDX Broker will automatically contact your MLS for their approval.
Some MLSs have slightly different processes that require the agent to reach out to the MLS directly or login to an online portal to start the approval process. If this is the case, you will receive instructions to get started.
HOW TO INSTALL THE IMPRESS IDX PLUGIN
It is not necessary for you to use the IMPress IDX plugin to use the IDX Broker service, but it makes it easier in my opinion.
You can download the plugin before your account is active and downloading the plugin is free.
Installing Your Plugin:
- Navigate to the “Plugins” > “Add New” section of your WordPress Dashboard
- In the “Keyword” search box type > IMPress IDX
- When you see the “IMPress for IDX” plugin click the “Install Now” button
- Click the “Activate” button
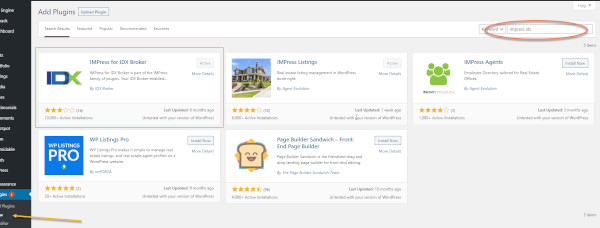
Once activated you will now find your plugin in the “Plugins” > “Installed Plugins” section. Or you can access the functionality directly in your dashboard by visiting the “IDX IMPress” section in your WordPress Dashboard.
Under the category of “IDX IMPress” you will find the subcategories of:
- Initial Settings
- Omnibar Settings
- Wrappers
- IDX Pages
- Saved Searches
- Add Search
HOW TO SETUP THE IMPRESS IDX PLUGIN
Once your account has been approved you will receive an email with login instructions to your IDX Broker account. Setting up your IMPress IDX plugin will require you to be logged in to both your WordPress Dashboard and your IDX Broker account.
Setting Up Your Plugin:
- Navigate to the “IDX IMPress” > “Initial Settings” section of your WordPress Dashboard
- Navigate to the “Home” > “Access Control” section of your IDX Broker account
- Click in the green box under “Account API” to copy the API Key
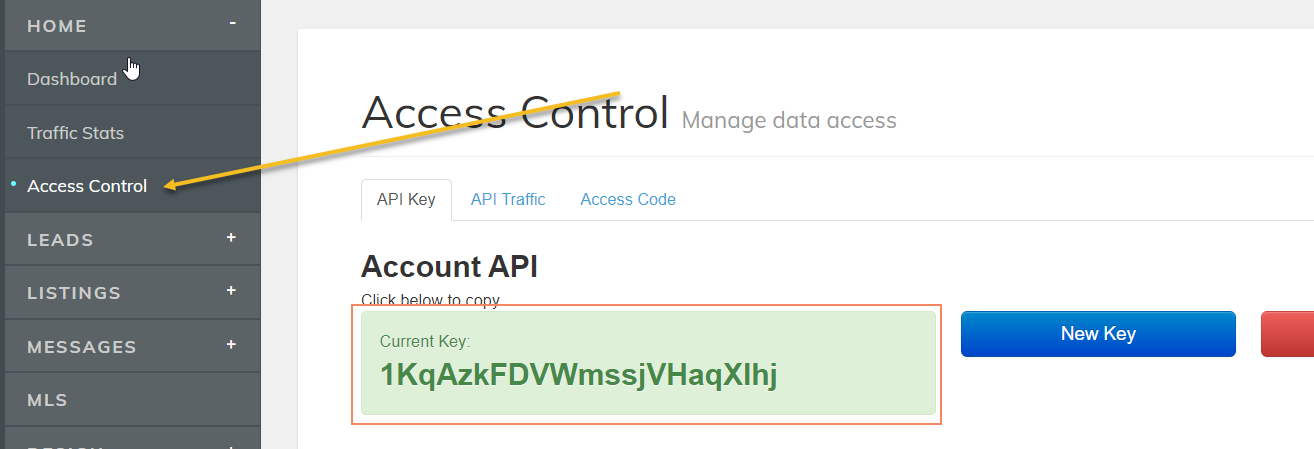
4. Navigate back to the “IDX IMPress” > “Initial Settings” section of your WordPress Dashboard
5. Paste the API Key you just copied from IDX Broker into the “Enter Your API Key” box and click “Refresh Plugin Options”
6. Enter a name into the “Page Name:” box under the “Globar Wrapper” section and click “Update”
○ This will be the page template that IDX Broker uses to create all your IDX related pages.
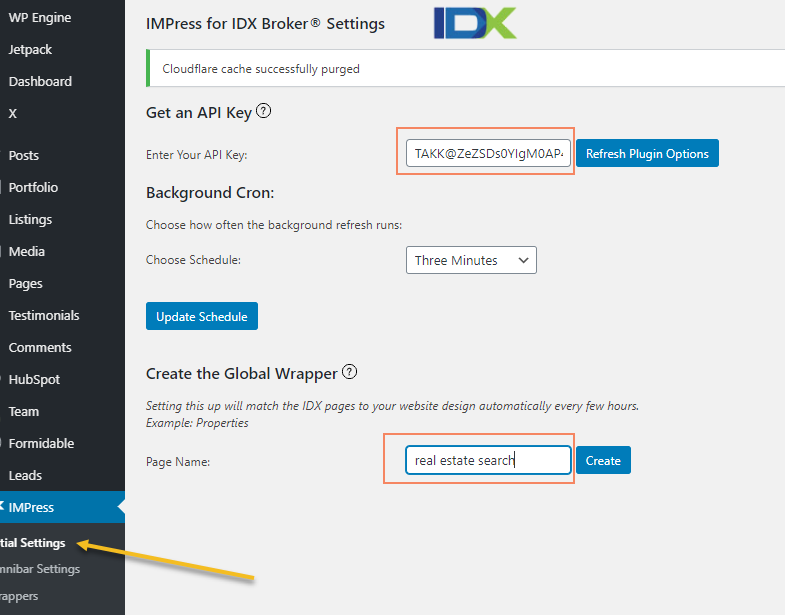
The Global Wrapper Concept is a bit confusing, let me try to simplify it.
As I mentioned earlier what makes IDX Broker so reliable is that they host all 600 MLS feeds on their own servers. The MLS feed is all the listings from your MLS and the search functionality.
The trick is how to get all the listings that are actually displaying on the IDX Broker website to display on your WordPress website seamlessly while still giving your website a little SEO power.
It is done with a combination of the Global Wrapper tool and Subdomain/Domain Control. (I will discuss how to set this up later in this article)
Basically we take a blank page from your WordPress website and Wrap it around the MLS feed on the IDX Broker server. Then we add a subdomain to your website domain to point the wrapped page to.
The Wrapper makes the IDX Broker feed look the same as your website and the subdomain makes it look like we are still on your website.
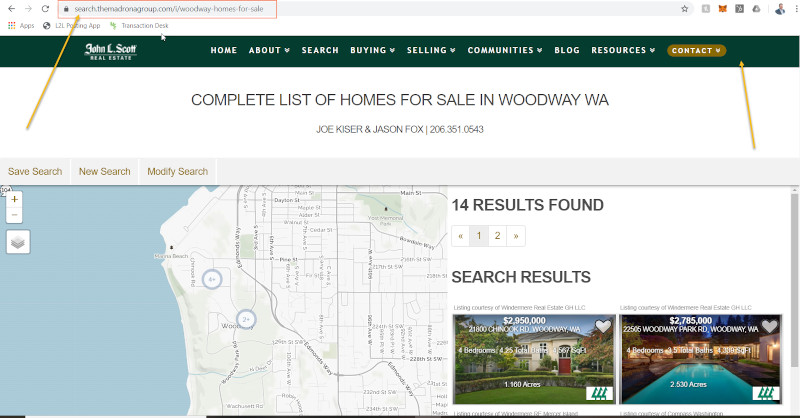
As you can see from the Wrapped Page example below:
- We added the subdomain “Search” to our domain: www.TheMadronaGroup.com
- We still have the same Header, Menu Structure, Colors, Fonts, Foooter, etc.
- It seems as though we are still on TheMadronaGroup website, but we are actually on the IDX Broker site.
HOW TO CREATE THE GLOBAL PAGE WRAPPER
When you added a name to the “Global Wrapper” “Page Name” the IMPress plugin created a blank page and added that domain to your IDX Broker account.
You Can See The Blank Page That Was Created On Your WordPress Website Here:
-
- Navigate to your WordPress Dashboard > “IMPress IDX” > “Wrappers”
- You should see a page with the same name as you entered earlier
- If you hover over the title of the page you can “Edit”, “Trash” or “View” the Wrapper Page
- Navigate to your WordPress Dashboard > “IMPress IDX” > “Wrappers”
You Can See where the Blank Page is Used As Your Wrapper on IDX Broker Here:
-
- Navigate to your IDX Broker account “Design” > “Website” > “Wrappers”
- In the “Dynamic URL” box you will see the URL of the blank Global Wrapper page that the plugin created
- It is important that there is a trailing / at the end of the domain or it will not work
- By default a “Global” page is created, however you could create a wrapper for different “Categories, Pages or Saved Links”
- It is not necessary to make any changes here, especially unto you really understand how the platform performs.
- By default the plugin creates a “Dynamic” page, that means that if anything changes on your website it will dynamically change on your IDX Broker Wrapper
- Dynamic is preferred
- If your theme does not play well with the IDX Broker platform (I have not run across many that do not) you can load your blank Wrapper Page Manually
- This process is somewhat technical and the instructions can be found here: Static Global Wrapper
- Dynamic is preferred

There is an inconspicuous link titled “Clear Wrapper Cache” that is quite important while setting up your IDX Broker account and integrating it with your WordPress website.
Anytime you make a change to your site you should go back and click that link to clear the IDX Broker cache. If you don’t it will most likely appear as though you have not made any changes when you go to check them on your website.
IMPRESS IDX OMNIBAR
When you visit Zillow, Redfin, Trulia or Realtor.com you will notice that they all have something in common.
The home page is a single image with a simple tagline and a search box. If you start to type in the different search boxes they will autocomplete and help you find what you are looking for. Then when you hit the Search button they will send you off to look at your desired listings.
You can replicate that search box with the Omnibar.
Learn all about in the video below.
- Navigate back to the “IDX IMPress” > “Omnibar Settings” section of your WordPress Dashboard
- By default the omnibar searches by City, County, Postal Code, Address, or Listing ID.
- You can add up to 10 more search parameters
- Each MLS is a bit different in their search parameters but I like to add things like:
- School District
- Community
- Neighborhood
- Property Type
- View
- Each MLS is a bit different in their search parameters but I like to add things like:
- You can edit the “Custom Placeholder” to fit your website
- For example Zillows says: Enter an address, neighborhood, city or zip code
- Once you have the Omnibar customized for your website you can add the search bar to your website via widget or shortcode
- To add the Omnibar via a widget you would navigate to your WordPress dashboard > “Appearance” > “Widgets” > “Impress Omnibar Search” and drag the widget to your desired widget location
- To add the Omnibar via a shortcode you would just copy and paste the shortcode below into any text editor or widget section of your WordPress Theme
- [idx-omnibar styles=”1″ extra=”0″ min_price=”0″ ]
You can also use the IMPress plugin to add custom searches, however it is limited in search parameters and I prefer to build my searches on the IDX Broker platform. We will discuss how to do that later in the article.
How to create and point your subdomain
This step is not critical to the functionality of the IDX Broker service… but I would NOT skip it.
This is what is going to make the transition from IDX Broker server to your WordPress real estate website seamless. It is also going to improve the SEO juice!
That being said this is the step that is going to require some technical knowledge. We will try to make it as simple as possible.
Step 1 – Create CNAME Record on Nameserver
Log into your website host or domain registrar. This is probably whomever you purchased your domain name from.
Create a CNAME record pointing your subdomain address to ‘subdomains.idxbroker.com‘(without the quotes). This CNAME is typically a short word, like search, or homes.
Here is help for some popular hosting services.
| GoDaddy.com | Host Gator | 1and1 | Bluehost |
| Network Solutions | Yahoo Small Business | CloudFlare |
NOTE: It is recommended to wait one day between Step 1 and Step 2. This will give your new CNAME record time to propagate across the Internet.
Step 2 – Point your IDX Broker pages to the new location
Enter your new custom domain in your IDX Control Panel under Account > Details:

Here you will see a section called Subdomain/Domain Control. Your standard IDX subdomain is on the left and your Custom Domain settings are on the right.
Set Use Custom Domain to Yes.
Enter in the CNAME from step 1 into the Custom Domain field.

How to optimize your IDX Broker account
If you skipped this step it would not affect your ability to display the IDX Broker feed onto your website. Most of the default settings are adequate.
Keep in mind these are just my preferred settings and you can choose to set it up any way you like.
- Navigate to your IDX Broker account “Leads” > “Lead Registration” > “Simple”
- Click on “Balanced”
- This will allow your visitors to perform searches and view a few listings before asking them to sign up
- Choose “Conservative” if you do not want to bother your visitors with lead capture
- Choose “Aggressive” if you want to make all visitors sign up
- This will allow your visitors to perform searches and view a few listings before asking them to sign up
- Click “Save Changes”
- Click on “Balanced”
- Navigate to your IDX Broker account “Leads” > “Lead Registration” > “Advanced”
- “When enabled will block all lead submissions except from the US, Canada, Mexico and surrounding Islands” > Yes
- “Enable Social Media Logins on Lead Capture Forms” > Yes
- “Captcha on Lead Registration” > Yes
- “SMS Alerts” “Opt-In” > Yes > Enter you cell phone number
- Click “Save Changes”
- Navigate to your IDX Broker account “Design” > “Website” > “Subheaders”
- In the text editor box enter: YOUR NAME | PHONE NUMBER
- Highlight YOUR NAME | PHONE NUMBER and choose “Heading 4” and “Center”
- Click “Save Changes”
- Navigate to your IDX Broker account “Design” > “Settings” > “Global” > “Search”
- “Default Minimum Price” & “Default Maximum Price” delete numbers
- Click “Save Changes”
- Navigate to your IDX Broker account “Design” > “Settings” > “Global” > “Results”
- “Default Number of Properties Per Page” > 10
- Click “Save Changes”
- Navigate to your IDX Broker account “Design” > “Settings” > “Global” > “Details”
- “Map Type” > “Default Map Provider”
- “Map Width” > 100%
- “Map Height” > 400px
- “Map Location on Page” > “After Field Containers”
- “Contact Form” > “Request More Information”
- “Display Great Schools” > Enable
- “Display Walk Score Widget” > “After Field Containers”
- “Walkscore Width” > 100%
- “Walkscore Height” > 400px
- “Show Similar Listings on Details Page” > Yes
- Click “Save Changes”
- Navigate to your IDX Broker account “Design” > “Settings” > “Global” > “Map”
- “All Results Page Maps” > Yes
- “Pin Clustering” > Enabled
- Click “Save Changes”
- Navigate to your IDX Broker account “Design” > “Settings” > “Global” > “Mobile”
- Make sure that both “Use Mobile Wrappers” & “Detect Tablets as Mobile Device” are set to NO
- Click “Save Changes”
- Navigate to your IDX Broker account “Design” > “Settings” > “Global” > “Other”
- “Logo Information” > “Upload a photo” > upload your business logo
- “Receive email for every MLS notifications” > Yes
- Setup Your “Timezones”
- “Global Design Settings” > Delete boxes
- “Show Amortization” > Yes
- “Custom Privacy Policy URL” > Add a link to your websites privacy policy
- Click “Save Changes”
- Navigate to your IDX Broker account “Account” > “Details” > “Account”
- Ensure this section is cleaned up with correct names, numbers, emails, proper formatting and capitolization
- Click “Save Changes”
How to create custom searches
Creating custom searches is not a necessity to implementing the IDX Broker service but will add value to your real estate website. I am not going to begin to say that I know how best to create these.
There are a million different ways that you can create and organize searches on your website. The most common way is to create searches for each city or neighborhood that you specialize in.
You can categorize searches by: Price, Property Type, Location, Schools, Views, Rooms, Acreage, Square Feet, Stories, Garage, Pools, Barns, and so many more.
To keep things simple I will show you how to create custom searches for cities. I prefer to create widgets and place the widget in a page template on my WordPress website. However, you can also create a custom search as an IDX Broker Page link.
Here is How to Create Custom Search Widgets:
- Navigate to your IDX Broker account “Design” > “Website” > “Widgets”
- Click on “CREATE NEW”
- “Select Type of Widget” > “Showcase”
- This will create a Gallery of listings
- “Properties to Feature” > “Custom Search”
- “Choose a Search Page” > “Advanced Search”
- “Select Type of Widget” > “Showcase”
- “Widget Options” > “Responsive” > Yes
- “Widget Name” > City Homes For Sale
- “# Columns” > 5
- “# Listings” > 10
- “Display View All Results Link” > Yes
- Click “Build Widget”
- Copy the Widget Code that was produced
- Click on “CREATE NEW”

You can paste that code anywhere on your Real Estate Website where there is a text editor or a widget that accepts HTML.
You can repeat that process to create a complete library of custom searches that represent the entire area that you work in. Then you can create a library of searches in a different category, and so on and so on…
When you create searches in this manner it is important to note that the search will not display on your WordPress website until you put the code there.
I will show you how to do this next by creating a neighborhood page.
How to create neighborhood pages
You can create a neighborhood (or city, or county, or zip code) page as simply or extravagantly as you wish. I am going to create a simple page for this example.
The beauty of this technique is that you can start simply and always come back and build on the pages to make them more customized and informative. You can add images, videos, descriptions, market statistics, school information, park information, restaurants, shops, hotels, things to do…
We are just going to add the Homes For Sale:
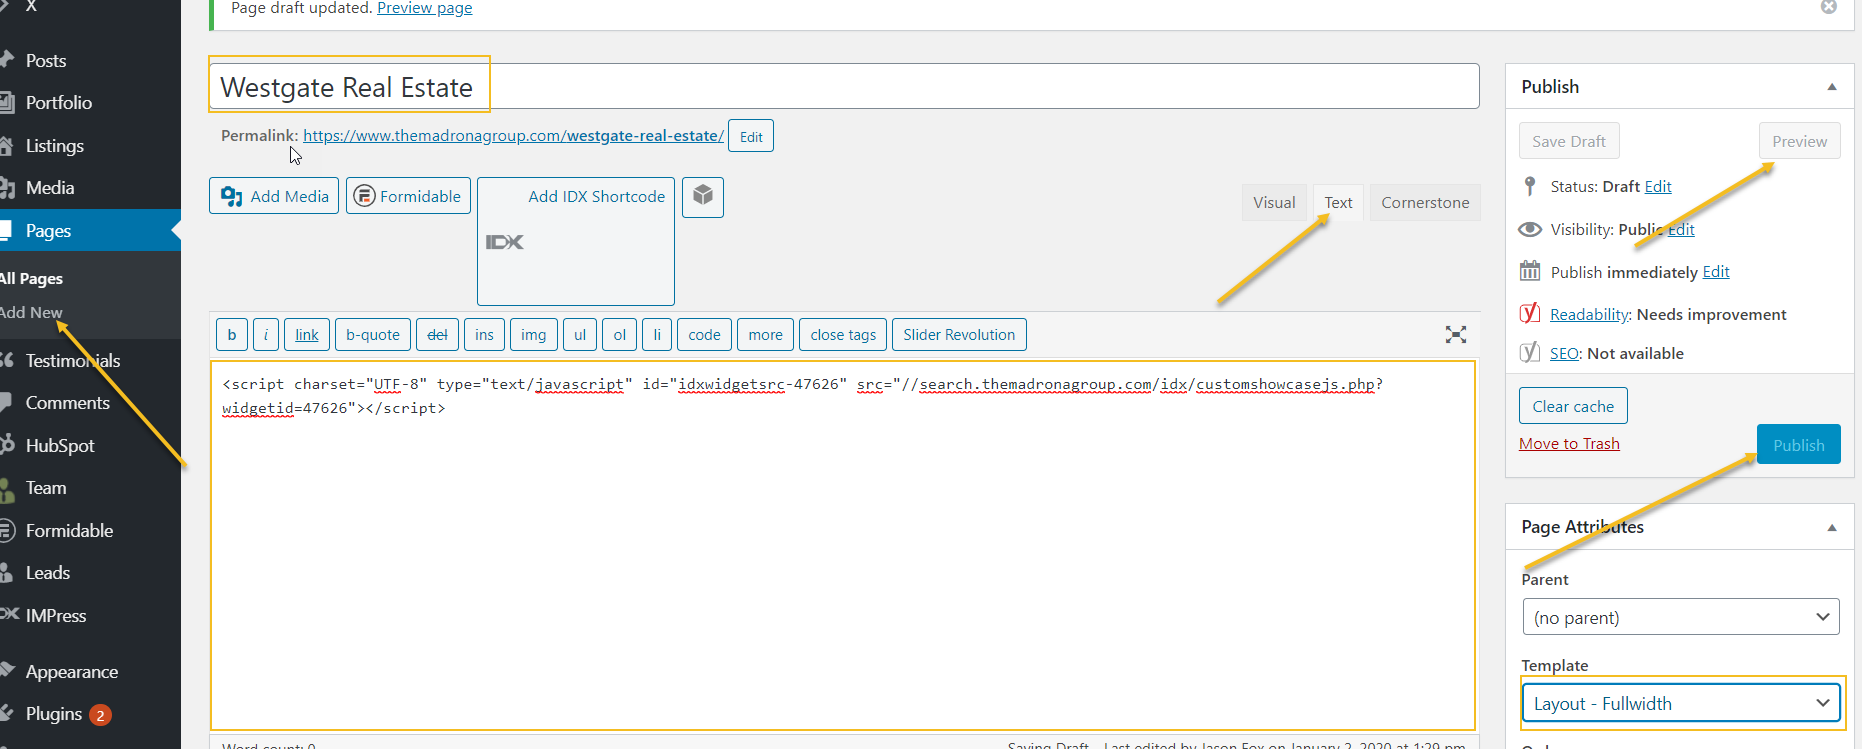
- Navigate to your WordPress Dashboard > “Pages” > “Add New”
- Title Box > City Real Estate or City Homes For Sale or City Guide
- Click “Text” tab
- Paste Widget Code from the previous section into the Text Editor box
- “Page Attributes” > “Template” > Choose a full width layout (each theme is a little different in how it words this)
- Click “Preview” button to make sure that your search is displaying properly
Your Page Setup Should Look Something Like This:
Your Page Preview Should Look Something Like This:
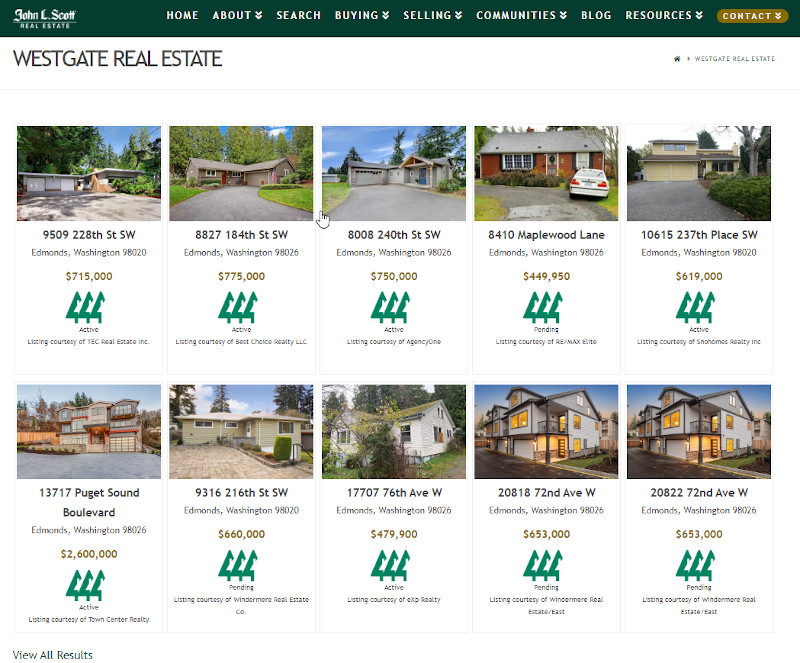
You can simply add more content to that page to create a more robust neighborhood page or you can leave it as is.
How to integrate IDX Broker search functionality
There are many ways to integrate and organize all the different search features that are available with your IDX Broker platform. I am just going to show you my preferred method.
We have already discussed how to add the Omnibar and how to create custom search widgets to add as Neighborhood pages.
How To Add Search Functionality:
- Navigate to your IDX Broker Account > “Websites” > “Page Templates”
- This is a list of pre-made search page templates including these pages that I use:
- BASIC SEARCH
- BY ADDRESS
- BY MLS #
- Advanced SEARCH
- Email Update Signup
- MAP SEARCH
- Featured
- Sold/Pending (if you signed up for this service)
- Mortgage Calculator
- Home Valuation
- My Account
- User Signup
- Click “Link” of the page you want to add
- Copy the Link, for example: https://search.themadronagroup.com/idx/search/Basic-Search-Of-Puget-Sound-Listings
- Navigate to your WordPress Dashboard > “Appearance” > “Menus”
- Here we are going to add these IDX Pages as Pages on your Real Estate Website
- “Select A Menu To Edit” > Choose your primary home screen navigation menu
- Click “Select”
- Under “Add Menu Items” > “Custom Links” > “URL” > Paste the link you just copied from IDX Broker
- “Link Text” > Search
- Click “Add To Menu”
- The Menu Items are Drag N Drop so you can move the Search Page where it makes sense for your website
- I will generally make this one of the first couple of menu items
- Click “Save Menu”
- Repeat until you have added all the desired IDX Page Templates
SUMMARY
If you are going to build a self-hosted WordPress real estate website you are going to need an IDX feed. For over a decade I have been using and recommending that you use IDX Broker.
IDX Broker has a plugin called IMPress IDX Plugin. The only problem with IDX Broker is that it can be a bit of a challenge to get setup for the average DIY real estate agent.
I created this post to make it easy to get your IDX Broker plugin setup just the way I would if I was building your website for you.
post contents
Over the last decade I have installed thousands of IDX Broker plugins onto different WordPress websites. Agent sites, team sites, commercial sites, brokerage sites, property management sites. I have built sites for an agent in nearly every 50 states, Canada and Mexico.
I have installed IDX Broker on all kinds of different themes such as; Genesis, Avada, Equity, Thesis, Divi, X Theme, Betheme, Elegant Themes, WP Residence and many more that I cannot remember.
That is what I love about the IDX Broker plugin is that while the technology keeps changing and the needs of the agents keep evolving the plugin just keeps working.
Over the years I have been persuaded to install different IDX services, most have gone out of business or completely changed business models and left clients without service. But, IDX Broker has always been there and taken care of their clients.
What makes IDX broker so special is the same thing that many “gurus” have condemned them for. They host all the IDX information on their own highly optimized servers.
Many of these so called “gurus” over the years have told you not to use IDX Broker because you would not get the SEO benefits of having the data on your server.
Here Is Why That Information Is Bogus:
- Trying to get SEO out of listings is a loosing battle. We can not compete with Zillow, Redfin, Trulia, Realtor.com, etc.
- If you try to store all the listing data on your sites server it will slow your database down to a near halt.
- If you are responsible for making sure that all the data that is stored on your server is correct it will slow your real estate business down to a near halt.
- By completing the suggested install instructions you create a subdomain on your site that, according to Google, is just as efficient as a subfolder for SEO.
I have rated the WordPress IDX Plugins in great detail here: BEST IDX PLUGINS REVIEWED
It is important to keep in mind that we are talking about implementing your MLS data into a self-hosted WordPress website. Full transparency I do believe that other proprietary services have built a superior IDX service. Those services are generally going to cost you at least $1k a month plus set-up fee. So to be fair it is a slightly different ball game.
If you are convinced that installing IDX Broker into your self-hosted WordPress website is the best option for you then continue reading and we will walk through:
TABLE OF CONTENTS
HOW TO ORDER YOUR IDX SERVICE
This may seem like a silly place to start, I mean we all know how to order things online these days, but there are a few things that we should discuss.
The first thing you will need to do is go to the sign up form: IDX BROKER SIGN UP FORM
(If you use this link I will earn a small commission. It will also save you the $100 set up fee)
- CHOOSE YOUR PRODUCT: IDX BROKER LITE or IDX BROKER PLATINUM
- You will receive many upgrades with the platinum version that you can see here: Compare Lite vs. Platinum
- The biggest differences are that the Platinum offers:
- Polygon Search on the Map Search
- You can create Map Search Widgets
- Social Media Login for Lead Generation
- More control over the MLS data for detailed search and results pages
- The ability to add sold data to your feed if it is available with your MLS
- $20 month additional
- AGENT/COMPANY:
- This part is self explanatory
- Make sure to enter your Managing Brokers email address as they will probably be required to sign a form for your approval
- ACCOUNT SETUP:
- Select the MLS that you are licensed in
- It is important to note that some MLS’s add a “Data Management Fee”
- If you choose Platinum and would also like to display your sold listings and it is available with your MLS check the “Sold Data” box
- Additional Agent Seats:
- If you are a single Agent or Broker choose: No Add On
- If you are a team of 2 Agents or Brokers choose: Team Account 2 Users
- If you are a team or office of 3-10 Agents or Brokers choose: Office 3-10 Multi Users
- If you are more than 10 select the corresponding number of agents in your office to the Multi User Seats option
- Select the MLS that you are licensed in
- Agree to the Terms of Service and Click Continue
- Enter Your Payment Information and Continue
- Your card will not be billed unto you have been approved and your account has been created
You will receive an email from IDX Broker letting you know that your order has been started.
The next part really depends on what MLS, Brokerage and Office you are a part of. The Approval Process can take a couple of hours or I have seen it take a couple weeks.
Make sure to keep your eye out for further instructions from IDX Broker and possibly your MLS.
The approval process most often involves sending electronic forms to the agent and broker to sign. We use an online document signing service to request the signatures. Once they are received IDX Broker will automatically contact your MLS for their approval.
Some MLSs have slightly different processes that require the agent to reach out to the MLS directly or login to an online portal to start the approval process. If this is the case, you will receive instructions to get started.
HOW TO INSTALL THE IMPRESS IDX PLUGIN
It is not necessary for you to use the IMPress IDX plugin to use the IDX Broker service, but it makes it easier in my opinion.
You can download the plugin before your account is active and downloading the plugin is free.
Installing Your Plugin:
- Navigate to the “Plugins” > “Add New” section of your WordPress Dashboard
- In the “Keyword” search box type > IMPress IDX
- When you see the “IMPress for IDX” plugin click the “Install Now” button
- Click the “Activate” button

Once activated you will now find your plugin in the “Plugins” > “Installed Plugins” section. Or you can access the functionality directly in your dashboard by visiting the “IDX IMPress” section in your WordPress Dashboard.
Under the category of “IDX IMPress” you will find the subcategories of:
- Initial Settings
- Omnibar Settings
- Wrappers
- IDX Pages
- Saved Searches
- Add Search
HOW TO SETUP THE IMPRESS IDX PLUGIN
Once your account has been approved you will receive an email with login instructions to your IDX Broker account. Setting up your IMPress IDX plugin will require you to be logged in to both your WordPress Dashboard and your IDX Broker account.
Setting Up Your Plugin:
- Navigate to the “IDX IMPress” > “Initial Settings” section of your WordPress Dashboard
- Navigate to the “Home” > “Access Control” section of your IDX Broker account
- Click in the green box under “Account API” to copy the API Key

4. Navigate back to the “IDX IMPress” > “Initial Settings” section of your WordPress Dashboard
5. Paste the API Key you just copied from IDX Broker into the “Enter Your API Key” box and click “Refresh Plugin Options”
6. Enter a name into the “Page Name:” box under the “Globar Wrapper” section and click “Update”
○ This will be the page template that IDX Broker uses to create all your IDX related pages.

The Global Wrapper Concept is a bit confusing, let me try to simplify it.
As I mentioned earlier what makes IDX Broker so reliable is that they host all 600 MLS feeds on their own servers. The MLS feed is all the listings from your MLS and the search functionality.
The trick is how to get all the listings that are actually displaying on the IDX Broker website to display on your WordPress website seamlessly while still giving your website a little SEO power.
It is done with a combination of the Global Wrapper tool and Subdomain/Domain Control. (I will discuss how to set this up later in this article)
Basically we take a blank page from your WordPress website and Wrap it around the MLS feed on the IDX Broker server. Then we add a subdomain to your website domain to point the wrapped page to.
The Wrapper makes the IDX Broker feed look the same as your website and the subdomain makes it look like we are still on your website.
As you can see from the Wrapped Page example below:
- We added the subdomain “Search” to our domain: www.TheMadronaGroup.com
- We still have the same Header, Menu Structure, Colors, Fonts, Foooter, etc.
- It seems as though we are still on TheMadronaGroup website, but we are actually on the IDX Broker site.
HOW TO CREATE THE GLOBAL PAGE WRAPPER
When you added a name to the “Global Wrapper” “Page Name” the IMPress plugin created a blank page and added that domain to your IDX Broker account.
You Can See The Blank Page That Was Created On Your WordPress Website Here:
-
- Navigate to your WordPress Dashboard > “IMPress IDX” > “Wrappers”
- You should see a page with the same name as you entered earlier
- If you hover over the title of the page you can “Edit”, “Trash” or “View” the Wrapper Page
- Navigate to your WordPress Dashboard > “IMPress IDX” > “Wrappers”
You Can See where the Blank Page is Used As Your Wrapper on IDX Broker Here:
-
- Navigate to your IDX Broker account “Design” > “Website” > “Wrappers”
- In the “Dynamic URL” box you will see the URL of the blank Global Wrapper page that the plugin created
- It is important that there is a trailing / at the end of the domain or it will not work
- By default a “Global” page is created, however you could create a wrapper for different “Categories, Pages or Saved Links”
- It is not necessary to make any changes here, especially unto you really understand how the platform performs.
- By default the plugin creates a “Dynamic” page, that means that if anything changes on your website it will dynamically change on your IDX Broker Wrapper
- Dynamic is preferred
- If your theme does not play well with the IDX Broker platform (I have not run across many that do not) you can load your blank Wrapper Page Manually
- This process is somewhat technical and the instructions can be found here: Static Global Wrapper
- Dynamic is preferred

There is an inconspicuous link titled “Clear Wrapper Cache” that is quite important while setting up your IDX Broker account and integrating it with your WordPress website.
Anytime you make a change to your site you should go back and click that link to clear the IDX Broker cache. If you don’t it will most likely appear as though you have not made any changes when you go to check them on your website.
IMPRESS IDX OMNIBAR
When you visit Zillow, Redfin, Trulia or Realtor.com you will notice that they all have something in common.
The home page is a single image with a simple tagline and a search box. If you start to type in the different search boxes they will autocomplete and help you find what you are looking for. Then when you hit the Search button they will send you off to look at your desired listings.
You can replicate that search box with the Omnibar.
Learn all about in the video below.
- Navigate back to the “IDX IMPress” > “Omnibar Settings” section of your WordPress Dashboard
- By default the omnibar searches by City, County, Postal Code, Address, or Listing ID.
- You can add up to 10 more search parameters
- Each MLS is a bit different in their search parameters but I like to add things like:
- School District
- Community
- Neighborhood
- Property Type
- View
- Each MLS is a bit different in their search parameters but I like to add things like:
- You can edit the “Custom Placeholder” to fit your website
- For example Zillows says: Enter an address, neighborhood, city or zip code
- Once you have the Omnibar customized for your website you can add the search bar to your website via widget or shortcode
- To add the Omnibar via a widget you would navigate to your WordPress dashboard > “Appearance” > “Widgets” > “Impress Omnibar Search” and drag the widget to your desired widget location
- To add the Omnibar via a shortcode you would just copy and paste the shortcode below into any text editor or widget section of your WordPress Theme
- [idx-omnibar styles=”1″ extra=”0″ min_price=”0″ ]
You can also use the IMPress plugin to add custom searches, however it is limited in search parameters and I prefer to build my searches on the IDX Broker platform. We will discuss how to do that later in the article.
How to create and point your subdomain
This step is not critical to the functionality of the IDX Broker service… but I would NOT skip it.
This is what is going to make the transition from IDX Broker server to your WordPress real estate website seamless. It is also going to improve the SEO juice!
That being said this is the step that is going to require some technical knowledge. We will try to make it as simple as possible.
Step 1 – Create CNAME Record on Nameserver
Log into your website host or domain registrar. This is probably whomever you purchased your domain name from.
Create a CNAME record pointing your subdomain address to ‘subdomains.idxbroker.com‘(without the quotes). This CNAME is typically a short word, like search, or homes.
Here is help for some popular hosting services.
| GoDaddy.com | Host Gator | 1and1 | Bluehost |
| Network Solutions | Yahoo Small Business | CloudFlare |
NOTE: It is recommended to wait one day between Step 1 and Step 2. This will give your new CNAME record time to propagate across the Internet.
Step 2 – Point your IDX Broker pages to the new location
Enter your new custom domain in your IDX Control Panel under Account > Details:

Here you will see a section called Subdomain/Domain Control. Your standard IDX subdomain is on the left and your Custom Domain settings are on the right.
Set Use Custom Domain to Yes.
Enter in the CNAME from step 1 into the Custom Domain field.

How to optimize your IDX Broker account
If you skipped this step it would not affect your ability to display the IDX Broker feed onto your website. Most of the default settings are adequate.
Keep in mind these are just my preferred settings and you can choose to set it up any way you like.
- Navigate to your IDX Broker account “Leads” > “Lead Registration” > “Simple”
- Click on “Balanced”
- This will allow your visitors to perform searches and view a few listings before asking them to sign up
- Choose “Conservative” if you do not want to bother your visitors with lead capture
- Choose “Aggressive” if you want to make all visitors sign up
- This will allow your visitors to perform searches and view a few listings before asking them to sign up
- Click “Save Changes”
- Click on “Balanced”
- Navigate to your IDX Broker account “Leads” > “Lead Registration” > “Advanced”
- “When enabled will block all lead submissions except from the US, Canada, Mexico and surrounding Islands” > Yes
- “Enable Social Media Logins on Lead Capture Forms” > Yes
- “Captcha on Lead Registration” > Yes
- “SMS Alerts” “Opt-In” > Yes > Enter you cell phone number
- Click “Save Changes”
- Navigate to your IDX Broker account “Design” > “Website” > “Subheaders”
- In the text editor box enter: YOUR NAME | PHONE NUMBER
- Highlight YOUR NAME | PHONE NUMBER and choose “Heading 4” and “Center”
- Click “Save Changes”
- Navigate to your IDX Broker account “Design” > “Settings” > “Global” > “Search”
- “Default Minimum Price” & “Default Maximum Price” delete numbers
- Click “Save Changes”
- Navigate to your IDX Broker account “Design” > “Settings” > “Global” > “Results”
- “Default Number of Properties Per Page” > 10
- Click “Save Changes”
- Navigate to your IDX Broker account “Design” > “Settings” > “Global” > “Details”
- “Map Type” > “Default Map Provider”
- “Map Width” > 100%
- “Map Height” > 400px
- “Map Location on Page” > “After Field Containers”
- “Contact Form” > “Request More Information”
- “Display Great Schools” > Enable
- “Display Walk Score Widget” > “After Field Containers”
- “Walkscore Width” > 100%
- “Walkscore Height” > 400px
- “Show Similar Listings on Details Page” > Yes
- Click “Save Changes”
- Navigate to your IDX Broker account “Design” > “Settings” > “Global” > “Map”
- “All Results Page Maps” > Yes
- “Pin Clustering” > Enabled
- Click “Save Changes”
- Navigate to your IDX Broker account “Design” > “Settings” > “Global” > “Mobile”
- Make sure that both “Use Mobile Wrappers” & “Detect Tablets as Mobile Device” are set to NO
- Click “Save Changes”
- Navigate to your IDX Broker account “Design” > “Settings” > “Global” > “Other”
- “Logo Information” > “Upload a photo” > upload your business logo
- “Receive email for every MLS notifications” > Yes
- Setup Your “Timezones”
- “Global Design Settings” > Delete boxes
- “Show Amortization” > Yes
- “Custom Privacy Policy URL” > Add a link to your websites privacy policy
- Click “Save Changes”
- Navigate to your IDX Broker account “Account” > “Details” > “Account”
- Ensure this section is cleaned up with correct names, numbers, emails, proper formatting and capitolization
- Click “Save Changes”
How to create custom searches
Creating custom searches is not a necessity to implementing the IDX Broker service but will add value to your real estate website. I am not going to begin to say that I know how best to create these.
There are a million different ways that you can create and organize searches on your website. The most common way is to create searches for each city or neighborhood that you specialize in.
You can categorize searches by: Price, Property Type, Location, Schools, Views, Rooms, Acreage, Square Feet, Stories, Garage, Pools, Barns, and so many more.
To keep things simple I will show you how to create custom searches for cities. I prefer to create widgets and place the widget in a page template on my WordPress website. However, you can also create a custom search as an IDX Broker Page link.
Here is How to Create Custom Search Widgets:
- Navigate to your IDX Broker account “Design” > “Website” > “Widgets”
- Click on “CREATE NEW”
- “Select Type of Widget” > “Showcase”
- This will create a Gallery of listings
- “Properties to Feature” > “Custom Search”
- “Choose a Search Page” > “Advanced Search”
- “Select Type of Widget” > “Showcase”
- “Widget Options” > “Responsive” > Yes
- “Widget Name” > City Homes For Sale
- “# Columns” > 5
- “# Listings” > 10
- “Display View All Results Link” > Yes
- Click “Build Widget”
- Copy the Widget Code that was produced
- Click on “CREATE NEW”

You can paste that code anywhere on your Real Estate Website where there is a text editor or a widget that accepts HTML.
You can repeat that process to create a complete library of custom searches that represent the entire area that you work in. Then you can create a library of searches in a different category, and so on and so on…
When you create searches in this manner it is important to note that the search will not display on your WordPress website until you put the code there.
I will show you how to do this next by creating a neighborhood page.
How to create neighborhood pages
You can create a neighborhood (or city, or county, or zip code) page as simply or extravagantly as you wish. I am going to create a simple page for this example.
The beauty of this technique is that you can start simply and always come back and build on the pages to make them more customized and informative. You can add images, videos, descriptions, market statistics, school information, park information, restaurants, shops, hotels, things to do…
We are just going to add the Homes For Sale:
- Navigate to your WordPress Dashboard > “Pages” > “Add New”
- Title Box > City Real Estate or City Homes For Sale or City Guide
- Click “Text” tab
- Paste Widget Code from the previous section into the Text Editor box
- “Page Attributes” > “Template” > Choose a full width layout (each theme is a little different in how it words this)
- Click “Preview” button to make sure that your search is displaying properly
Your Page Setup Should Look Something Like This:

Your Page Preview Should Look Something Like This:

You can simply add more content to that page to create a more robust neighborhood page or you can leave it as is.
How to integrate IDX Broker search functionality
There are many ways to integrate and organize all the different search features that are available with your IDX Broker platform. I am just going to show you my preferred method.
We have already discussed how to add the Omnibar and how to create custom search widgets to add as Neighborhood pages.
How To Add Search Functionality:
- Navigate to your IDX Broker Account > “Websites” > “Page Templates”
- This is a list of pre-made search page templates including these pages that I use:
- BASIC SEARCH
- BY ADDRESS
- BY MLS #
- Advanced SEARCH
- Email Update Signup
- MAP SEARCH
- Featured
- Sold/Pending (if you signed up for this service)
- Mortgage Calculator
- Home Valuation
- My Account
- User Signup
- Click “Link” of the page you want to add
- Copy the Link, for example: https://search.themadronagroup.com/idx/search/Basic-Search-Of-Puget-Sound-Listings
- Navigate to your WordPress Dashboard > “Appearance” > “Menus”
- Here we are going to add these IDX Pages as Pages on your Real Estate Website
- “Select A Menu To Edit” > Choose your primary home screen navigation menu
- Click “Select”
- Under “Add Menu Items” > “Custom Links” > “URL” > Paste the link you just copied from IDX Broker
- “Link Text” > Search
- Click “Add To Menu”
- The Menu Items are Drag N Drop so you can move the Search Page where it makes sense for your website
- I will generally make this one of the first couple of menu items
- Click “Save Menu”
- Repeat until you have added all the desired IDX Page Templates
SUMMARY
If you are going to build a self-hosted WordPress real estate website you are going to need an IDX feed. For over a decade I have been using and recommending that you use IDX Broker.
IDX Broker has a plugin called IMPress IDX Plugin. The only problem with IDX Broker is that it can be a bit of a challenge to get setup for the average DIY real estate agent.
I created this post to make it easy to get your IDX Broker plugin setup just the way I would if I was building your website for you.
Latest articles
Short real estate videos can be transformed into powerful blog content with the right strategy. Learn how to expand on video topics, incorporate SEO best practices, and create engaging posts that drive traffic and boost your search rankings.
Learn how to create real estate community pages that attract buyers, boost your local SEO, and establish you as a market expert. This ultimate guide covers content creation tips, the use of AI tools, and IDX integration to help your pages stand out in 2024.
To stay competitive in real estate, agents must prioritize SEO to improve their Google visibility. By implementing proven strategies like asking for reviews, creating relevant content, and focusing on local SEO, you can attract more clients and increase your online presence.
BECOME A MEMBER
Become A Free DIY Real Estate Marketing Member & Get Access To:
LARGEST COLLECTION OF
Real Estate Marketing e-Books, Guides, Templates, & whitepapers
ON THE INTERNET
+ OVER 70 How To Website Training Videos including; WordPress, Agent Evolution Themes, & IDX Broker
+ DIY Real Estate Marketing Tips and Strategies Delivered to Your Inbox
Share this article
Written by : jasonfox
Jason Fox - Real Estate Marketing
Business: We build WordPress Real Estate Websites with IDX
Me: #GoHawks, #BringBackTheSonics, #MaybeNextYearMariners, #ILoveMyKids #SeattleSunLover #SeattleWaterLover #BFF
Blog: Focuses on Wordpress Websites, Content Management, SEO Services, SEM Campaigns, Social Media Marketing, Email Marketing, Beautiful Design, IDX, and more.




Amazing and informative!… Jason has tons of info for agents wanting more freedom and a better website presence without braking the bank! … What is unique is that this site is not a come on for getting one’s $ and present a choice of hiring Jason or (for some one with the know how) to go ahead and build his/her own web site.
Thanks Rick, I’m glad you’ve found this useful. Let me know if you have any questions.